Before sewing a layered ornament together, spread its pieces on the table and try a few arrangements. Turning one flower slightly can reveal a color that was hidden; moving a leaf can change the outline of the whole piece.
That is the approach behind this layered bloom mandala ornament crochet pattern. The flowers are made separately, with their own centers and petal supports. They are assembled only after you have checked how the layers sit together.
A lime center sits above blue and gray flowers outlined in white. Four green leaves project between the larger petals, while a teal flower forms the backing.

What You Will Make
| Piece | Quantity | Main detail |
|---|---|---|
| Lime center | 1 | Sixteen small points |
| Blue flower | 1 | Eight petals with white edging |
| Gray flower | 1 | Eight larger petals with white tips |
| Green leaf | 4 | Worked around a foundation chain |
| Teal backing flower | 1 | Twelve pointed petals |
| Hanging loop | 1, optional | Sewn to the backing |
The petals do not all align one-to-one. The blue and gray layers have eight petals each, while the teal backing has twelve. Arrange them by appearance rather than trying to match every tip.
Materials and Color Planning
Use sport-weight cotton yarn in five colors:
- A — Lime green: center and leaves.
- B — Sky blue: smaller flower.
- C — White: contrasting outlines.
- D — Light gray: middle flower.
- E — Teal: backing flower and optional loop.
You will also need a 3.0 mm crochet hook as a starting point, a tapestry needle, scissors, stitch markers, and a measuring tape. Have a suitable blocking surface and rust-resistant pins available if needed.
Keep the yarn thickness similar across the colors. A thicker outline yarn can change the petal shape as well as its appearance.
Finished diameter and yarn quantities depend on your materials and tension. Measure and record the completed sample before planning a matching set.
If you prefer a flower built through connected rear arches rather than separate pieces, explore the Layered Bloom Doily Crochet Pattern.
Reading the Layered Bloom Mandala Ornament Crochet Pattern
All terms are US crochet terms:
- ch: chain.
- sl st: slip stitch.
- sc: single crochet.
- hdc: half double crochet.
- dc: double crochet.
- tr: treble crochet.
- st / sts: stitch / stitches.
- sp: space.
- MR: magic ring.
For terminology differences, see the Craft Yarn Council’s crochet abbreviation guide.
Work the flowers in joined rounds without turning. Beginning chains do not count as stitches. Join to the first actual stitch unless another joining point is specified.
A picot means: ch 3, then sl st into the first of those three chains.
Each flower begins separately. Do not join a new flower directly onto an earlier piece.
Start with the Lime Center
With Color A:
Round 1: Make an MR. Ch 1 and work 16 sc into the ring. Tighten and join to the first sc.
Count: 16 sc.
Round 2: Ch 2. Work 2 dc into every stitch, beginning in the stitch at the base of the chain. Join to the first dc.
Count: 32 dc.
Round 3: Ch 1. Repeat the following sixteen times:
- Sc in the next stitch.
- Ch 3.
- Sl st in the second chain from the hook.
- Sc in the remaining chain.
- Sl st in the next stitch of Round 2.
Each repeat uses two stitches from Round 2.
Join to the first sc and fasten off with a sewing tail.
Count: sixteen small points.
Set this piece aside while you make the flowers beneath it.
A Shared Foundation for the Three Flowers
The blue, gray, and teal flowers use the same double crochet foundation sequence, stopping at different rounds.
At the start of every round, ch 2 without counting it as a stitch. Work the first dc into the stitch at the base of that chain and join to the first actual dc.
| Foundation round | Instructions | Count |
|---|---|---|
| 1 | Into an MR, work 12 dc. | 12 |
| 2 | Work 2 dc into every stitch. | 24 |
| 3 | Repeat 1 dc, 2 dc in the next stitch twelve times. | 36 |
| 4 | Repeat 1 dc in each of the next two stitches, 2 dc in the following stitch twelve times. | 48 |
| 5 | Repeat 1 dc in each of the next three stitches, 2 dc in the following stitch twelve times. | 60 |
Tighten and secure each magic ring.
For the blue flower, stop after Foundation Round 2.
For the gray flower, stop after Foundation Round 4.
For the teal flower, stop after Foundation Round 5.
These are three separate discs, not stages of the same piece.
Visual Guide: Petal Support Arches
Compare the base round, chain arch, and skipped stitches before working each flower. Blue and gray use eight arches; the teal backing uses twelve.
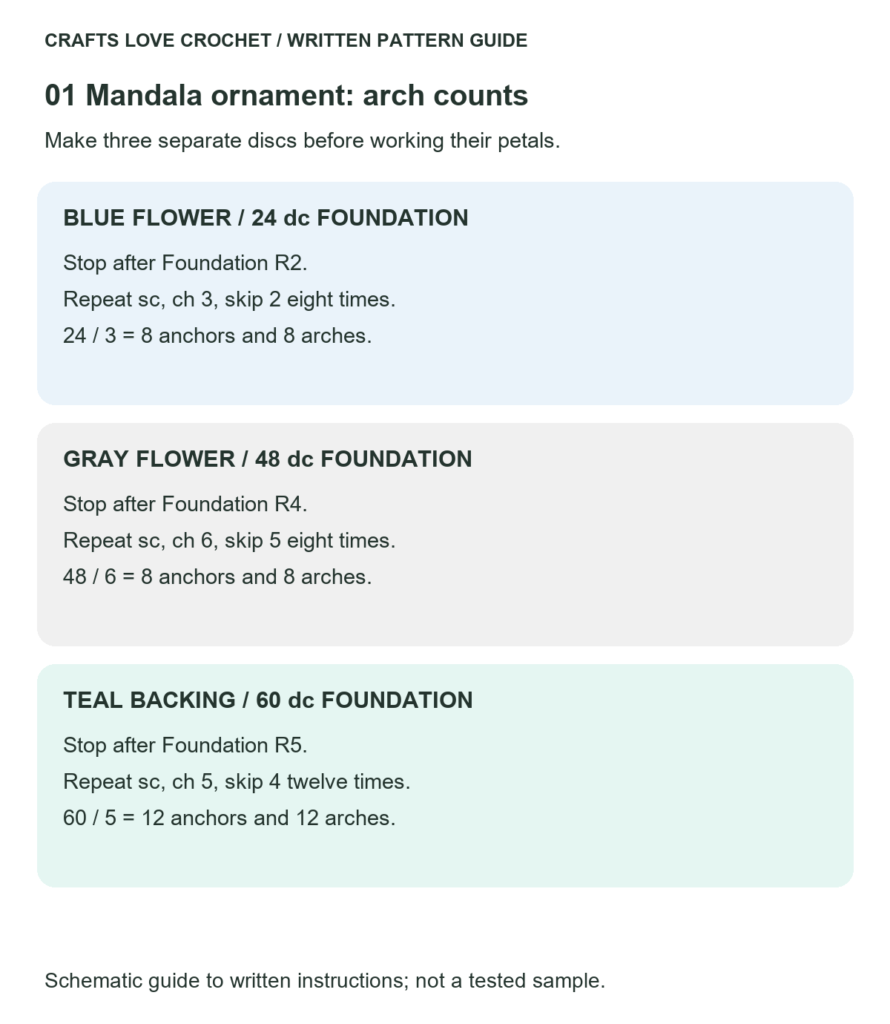
Open this guide at a larger size.
Blue Flower: Eight Petals and a White Outline
With Color B, make Foundation Rounds 1–2.
Blue Arch Round
Ch 1.
Repeat sc in the next stitch, ch 3, skip the next two stitches eight times.
After the final ch 3, join to the first sc.
Count: eight sc anchors and eight ch-3 arches.
Blue Petal Round
Sl st into the first arch. Ch 1.
Into that arch, work:
1 sc, 1 hdc, 3 dc, 1 hdc, 1 sc.
Sl st into the next sc anchor.
Repeat around, making one petal in every arch and one separating slip stitch in each following anchor.
Join to the first sc.
Count: eight petals, each containing seven stitches.
Fasten off blue.
White Outline
Join Color C in the first sc of any petal. Ch 1.
Across the seven stitches of that petal, work:
- Sc in stitch 1.
- Hdc in stitch 2.
- Work 2 dc in stitch 3.
- In stitch 4, work 2 dc, picot, 1 dc.
- Work 2 dc in stitch 5.
- Hdc in stitch 6.
- Sc in stitch 7.
Sl st into the separating slip stitch.
Repeat around and join to the first sc.
Count: eleven outline stitches and one picot per petal, excluding the separating slip stitches.
Fasten off and leave a tail for attaching the flower.
Gray Flower: A Broader Middle Layer
With Color D, make Foundation Rounds 1–4.
Gray Arch Round
Ch 1.
Repeat sc in the next stitch, ch 6, skip the next five stitches eight times.
Join to the first sc after the final arch.
Count: eight sc anchors and eight ch-6 arches.
Gray Petal Round
Sl st into the first arch. Ch 1.
Into each arch, work:
1 sc, 1 hdc, 9 dc, 1 hdc, 1 sc.
Sl st into the following sc anchor after each petal.
Join to the first sc.
Count: eight petals with thirteen stitches each.
Fasten off gray.
White Tip Round
Join Color C in the first stitch of a gray petal. Ch 1.
For each petal:
- Sc in each of the first six stitches.
- Work sc, ch 2, sc in stitch 7.
- Sc in each of the remaining six stitches.
- Sl st into the separating slip stitch.
Join to the first sc and fasten off.
Count: fourteen sc and one ch-2 tip per petal.
The tip is placed in the middle of the nine-dc section.
Four Leaves to Position Between the Layers
Make four separate leaves with Color A.
Ch 10.
Starting in the second chain from the hook, work one stitch into each successive chain:
sc, hdc, dc, dc, tr, tr, dc, hdc.
Work 3 sc into the final chain.
Rotate the foundation chain to reach its unused side. Do not turn the fabric over.
Skip the chain already holding the three-sc turning group. Along the remaining eight chain positions, work:
hdc, dc, tr, tr, dc, dc, hdc, sc.
Join to the first sc and fasten off with a sewing tail.
Count: nineteen stitches, excluding the join.
The three-sc end is the leaf tip. The starting and finishing end is the base that will be hidden between the flowers.
Teal Backing: Twelve Outer Petals
With Color E, make Foundation Rounds 1–5.
Teal Arch Round
Ch 1.
Repeat sc in the next stitch, ch 5, skip the next four stitches twelve times.
Join to the first sc.
Count: twelve sc anchors and twelve ch-5 arches.
Teal Petal Round
Sl st into the first arch. Ch 1.
Into each arch, work:
1 sc, 1 hdc, 3 dc, ch 2, 3 dc, 1 hdc, 1 sc.
Sl st into the following sc anchor.
After the final separator, join to the first sc.
Count: twelve petals, each containing ten stitches and one ch-2 tip.
Teal Outline Round
Ch 1.
For each petal:
- Sc in each of the first five stitches.
- Work sc, ch 2, sc into the tip space.
- Sc in each of the remaining five stitches.
- Sl st into the separating slip stitch.
Join to the first sc and fasten off.
Count: twelve sc and one ch-2 tip per petal.
Before Sewing: Compare the Pieces
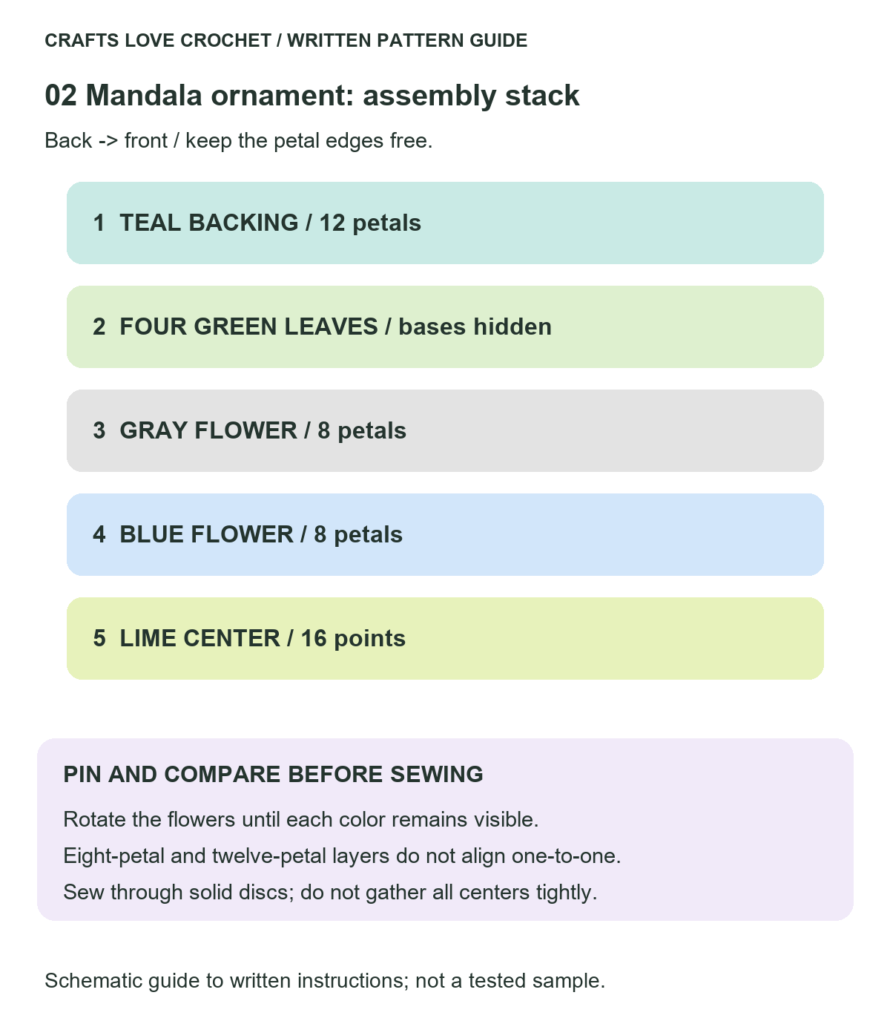
Lay the flowers on a level surface and stack them loosely:
- Teal backing.
- Four green leaves.
- Gray flower.
- Blue flower.
- Lime center.
Check whether each color remains visible.
Rotate the blue flower so its petals reveal parts of the gray layer. Position the leaves in four separate gaps, adjusting how far their bases overlap the backing.
If a larger layer is completely hidden or an edge is strongly crowded, pause before sewing. Check the counts, yarn thickness, and shape of the individual pieces. Correct arithmetic alone does not establish the finished proportions.
If blocking is appropriate, shape the separate pieces according to the yarn’s care instructions and let them dry completely before assembly.
Visual Guide: Layer Order from Back to Front
Arrange the five components from back to front before sewing. The eight-petal flowers and twelve-petal backing do not align one for one.
Open this guide at a larger size.
Assembling the Layered Bloom Mandala Ornament Crochet Pattern
Secure the Leaves First
Place the four leaf bases on the teal disc so the tips extend beyond the area that the gray flower will cover.
Sew each base to the teal fabric with several small stitches. Keep the stitches beneath the planned gray layer.
Add the Gray Flower
Center the gray flower over the teal backing.
Using matching yarn, sew through the solid disc portion at several evenly spaced positions. Keep the petal edges free.
Avoid pulling all the layers together with one tight stitch through the exact center.
Add the Blue Flower and Lime Center
Position the blue flower and attach its solid center to the gray disc with small distributed stitches.
Place the lime center last. Sew around its solid circular portion, leaving the sixteen small points free.
Turn the ornament over periodically to check that the sewing has not gathered the backing into a cup.
Add a discreet holding stitch beneath a petal base only where a layer needs support.
Give the Hanging Loop a Firm Attachment
Decide which point will be the top before attaching the loop.
With Color E, ch 24. Fasten off, leaving tails at both ends.
Bring the ends together to form a loop. Sew them to the reverse of the teal flower, along its solid disc near the chosen top.
Distribute the attachment over several stitches. Do not hang the entire ornament from a single petal tip or chain space.
Lift the piece gently and check its balance before securing the final tails.
If the backing folds or the layers sag when suspended, use the piece as a flat decoration while reassessing its support. A hanging loop does not make soft crochet rigid.
Small Checks That Prevent Difficult Finishing
Count the arches before making petals. Blue needs eight, gray needs eight, and teal needs twelve. A missing arch cannot be corrected simply by squeezing in another petal.
Keep the white outlines consistent. On the blue layer, increases widen the outline. On the gray layer, the ch-2 tip belongs in stitch seven.
Leave sewing tails, but secure the ring tails. A long assembly tail is useful; an unsecured magic ring can loosen beneath the other layers.
Photograph the arrangement before taking it apart. Once you like the positions, an overhead photograph makes it easier to return each leaf and flower to the same place while sewing.
Check the reverse as well as the front. Tight sewing can look neat from above while pulling the backing inward.
Three Design Decisions to Make
Should every layer lie flat?
The solid discs need to sit together without severe distortion, while the petal edges may lift. Do not force all the petals into a single plane.
Can the colors be changed?
Yes. Keep the yarn thickness similar, and decide which borders should remain visible. White outlines create a strong separation; a closer shade gives a softer transition.
Is a keyring necessary?
No. This construction is presented as a decorative layered ornament. The optional sewn loop provides a hanging point without requiring metal hardware.
For another ornament with a different outline, explore the Crochet Star Snowflake Wreath Ornament Pattern, which combines layered petals with small star decorations.
Keep the Assembly Details with Your Project Notes
Record the yarn, hook, finished diameter, and any adjustments to the discs, arches, or sewing positions.
Photograph the loose pieces as well as the assembled ornament. Those images make the construction of this layered bloom mandala ornament crochet pattern much easier to understand than a front view alone.