A raised orange popcorn flower sits at the center of this crochet heart granny motif pattern. A rust-colored granny square forms its foundation, and two treble-crochet shells shape the upper lobes before a peach border defines the outline.
The construction moves from a circle to a square and finally to a heart. Marking the corners and the middle spaces of the two upper sides keeps the lobe placement balanced.
Use the finished motif as a dimensional appliqué on a bag or cushion panel. Its shaped edges are not a direct substitute for a standard granny square in a blanket layout.

Choose the Colors Before Starting
You will need worsted-weight cotton yarn in four colors:
- Color A — Cream: flower center.
- Color B — Golden orange: popcorn petals.
- Color C — Rust brown: granny foundation and heart shaping.
- Color D — Light peach: final outline.
Also gather a 4.0 mm crochet hook as a starting point, a tapestry needle, scissors, four corner markers, and a measuring tape.
Use yarns of similar thickness. A substantially heavier border yarn can affect the curve of the lobes.
Finished measurements depend on your materials and tension. Make one complete sample before planning a layout with multiple motifs.
If you prefer a heart without a floral center, explore the Crochet Frilly Heart Applique Pattern, which uses a different construction and scalloped edge.
The Popcorn Stitch, Explained
This pattern uses US crochet terminology:
- ch: chain.
- sl st: slip stitch.
- sc: single crochet.
- dc: double crochet.
- tr: treble crochet.
- PC: popcorn stitch.
- st / sts: stitch / stitches.
- sp: space.
- MR: magic ring.
For standard terms and their UK equivalents, refer to the Craft Yarn Council’s crochet abbreviation guide.
Five-Double-Crochet Popcorn
Work 5 dc into the same indicated stitch.
Remove the hook from the working loop, keeping that loop open.
Insert the hook through the top of the first dc in the group, from front to back. Catch the dropped loop and pull it through the first dc.
Ch 1 to secure the popcorn.
When the instructions say “PC, ch 2,” make two additional chains after the securing chain.
Check that every popcorn projects toward the same face of the work.
Crochet Heart Granny Motif Pattern: Start with the Flower
Work in joined rounds without turning. Beginning chains do not count as stitches.
Round 1 — Cream Center
With Color A, make an MR.
Ch 2 and work 16 dc into the ring.
Tighten the ring and join with a sl st to the first actual dc.
Count: 16 dc.
Fasten off cream.
Round 2 — Eight Popcorn Petals
Join Color B in any dc.
Ch 2, then work a PC into that same stitch.
Ch 2 and skip the next stitch.
Continue around, working PC in the next stitch, ch 2, skip the next stitch until you have eight popcorns.
After the final ch 2 and skipped stitch, join with a sl st to the securing chain above the first popcorn.
Count: eight popcorns and eight additional ch-2 spaces.
Fasten off orange.
Each popcorn-and-skip repeat uses two stitches from the 16-stitch center.
Give the Flower a Granny Foundation
Round 3 — Establish Four Corners
Join Color C in any ch-2 space.
Ch 2. Into the same space, work:
3 dc, ch 2, 3 dc.
This is the first corner.
Ch 1. Work 3 dc into the next ch-2 space. Ch 1.
Repeat the following sequence three more times:
- In the next ch-2 space, work 3 dc, ch 2, 3 dc.
- Ch 1.
- Work 3 dc into the next ch-2 space.
- Ch 1.
Join to the first actual dc.
Count: 36 dc, four ch-2 corner spaces, and eight ch-1 side spaces.
The corners and side groups occupy alternating spaces around the flower.
Round 4 — Expand the Square
Sl st across to the first corner ch-2 space.
Ch 2. Work 3 dc, ch 2, 3 dc into that corner.
Ch 1. Work 3 dc into the next ch-1 space. Ch 1.
Work 3 dc into the following ch-1 space. Ch 1.
Repeat that sequence around the remaining three sides, placing a corner group in each corner space and a three-dc group in every ch-1 side space.
Join to the first actual dc.
Count: 48 dc, four ch-2 corners, and twelve ch-1 side spaces.
Fasten off rust.
Each side between two corner spaces contains twelve dc and three ch-1 spaces. The central one of those three spaces will be important for the upper lobes.
Mark the Four Landmarks
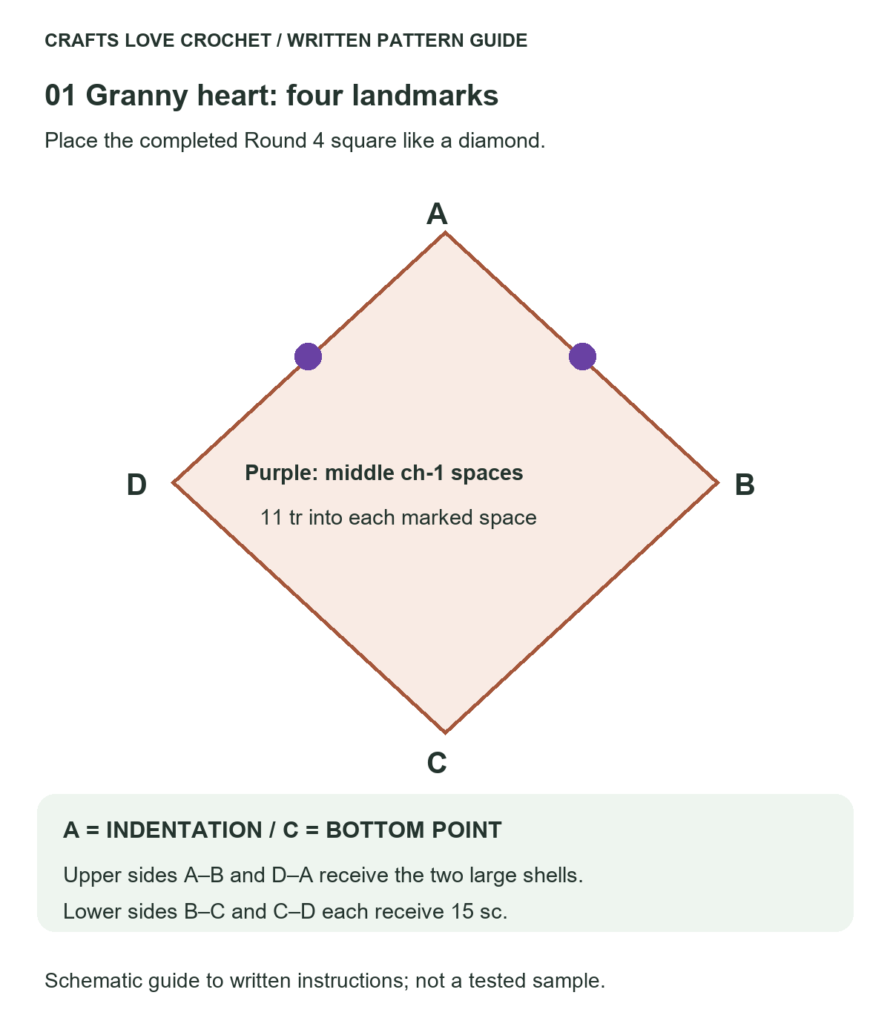
Place the square like a diamond, with one corner pointing upward and the opposite corner downward.
Label the corners in your normal working direction:
- A: upper corner, which becomes the indentation between the lobes.
- B: next corner, at one side of the heart.
- C: opposite A, forming the bottom point.
- D: remaining side corner.
The two upper sides are A–B and D–A.
The two lower sides are B–C and C–D.
On each upper side, mark the middle of its three ch-1 spaces. These are the attachment spaces for the two large shells.
Visual Guide: Corner Markers and Lobe Placement
Turn the square into a diamond and mark its four corners. Place the two lobe shells in the middle chain spaces of the upper sides.
Open this guide at a larger size.
Turn the Granny Foundation into a Heart
Round 5 — Rust Shaping Round
Rejoin Color C in corner space A.
Ch 1 and work 1 sc into that space.
First Upper Lobe
Work 11 tr into the marked middle ch-1 space on side A–B.
Skip the other stitches and spaces along that upper side; do not add stitches between corner A and the shell or between the shell and corner B.
Sl st into corner space B.
First lobe: 11 tr.
First Lower Side
Along side B–C, work:
- 1 sc into each of its twelve dc.
- 1 sc into each of its three ch-1 spaces.
Work these stitches in the order you encounter them.
Lower-side count: 15 sc.
In corner space C, work sc, ch 2, sc.
Second Lower Side
Along side C–D, work 1 sc into every dc and 1 sc into every ch-1 space.
Lower-side count: 15 sc.
Sl st into corner space D.
Second Upper Lobe
Work 11 tr into the marked middle ch-1 space on side D–A.
Skip the remaining stitches and spaces along that upper side.
Join with a sl st to the first sc made in corner A.
Fasten off rust.
The round contains two eleven-tr lobes, two fifteen-sc lower sides, and a ch-2 bottom point flanked by two sc.
Check the Shape Before Adding Peach
Place the motif down without stretching it.
Confirm that the shells occupy the middle spaces of the two upper sides, not the corner spaces.
The lower sides should match in stitch count. The two shell attachment points should be equally spaced from corner A.
If the lobes pull strongly across the granny foundation or the whole motif folds, pause here. Check the placement and assess the shell size with your yarn before adding the outline.
Finish the Crochet Heart Granny Motif Pattern
Round 6 — Peach Outline
Join Color D in the sc at the top indentation, corner A.
Ch 1 and work 1 sc into that same stitch.
Outline the First Lobe
Work across its eleven tr, placing:
- 2 sc into stitches 3, 6, and 9.
- 1 sc into each of the other eight stitches.
Count: 14 sc across the lobe.
Sl st into the side joining slip stitch at corner B.
First Lower Side and Point
Work 1 sc into each of the next fifteen lower-side sc.
Work 1 sc into the first sc of the bottom-point group.
Work sc, ch 2, sc into the bottom ch-2 space.
Second Lower Side
Work 1 sc into the remaining sc of the bottom-point group.
Work 1 sc into each of the next fifteen lower-side sc.
Sl st into the side joining slip stitch at corner D.
Outline the Second Lobe
Work across its eleven tr, again placing 2 sc into stitches 3, 6, and 9, and 1 sc into each remaining stitch.
Count: 14 sc across the second lobe.
Join to the first peach sc at the top indentation and fasten off.
Round total: 63 sc, one ch-2 bottom point, and two side separating slip stitches.
The count excludes the final joining slip stitch.
Visual Guide: Heart Outline Stitch Counts
Use these counts to check the two lobes, lower sides, and bottom point before fastening off the peach outline.
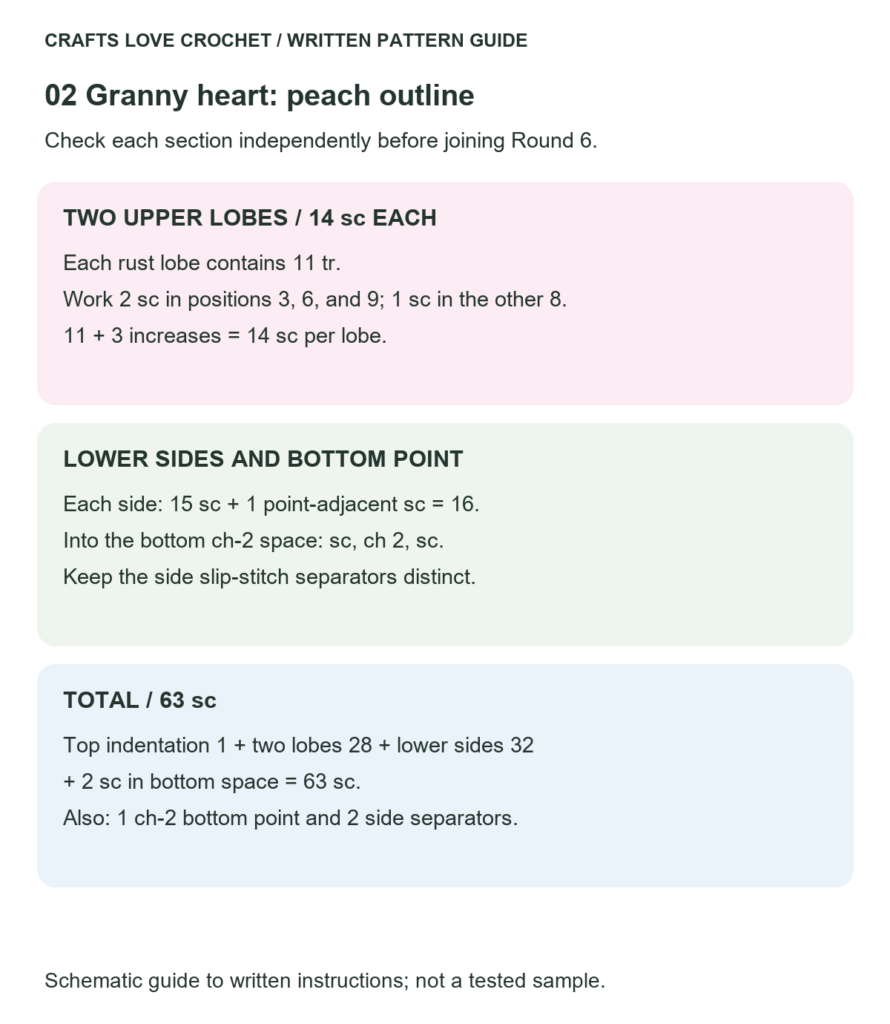
Open this guide at a larger size.
Where the Counts Come From
| Section of the peach outline | Single crochet count |
|---|---|
| Top indentation | 1 |
| First upper lobe | 14 |
| First lower side, including its point-adjacent stitch | 16 |
| Stitches worked into the bottom ch-2 space | 2 |
| Second lower side, including its point-adjacent stitch | 16 |
| Second upper lobe | 14 |
| Total | 63 |
This breakdown is useful if the round finishes with an unexpected count. Check one section at a time rather than recounting the entire edge repeatedly.
Shape the Outline Without Flattening the Flower
Secure the magic-ring tail and weave in the remaining ends through their corresponding colors.
If blocking is appropriate for your yarn, follow its care instructions.
Arrange the two lobes evenly, then position the bottom point. Keep the popcorns raised instead of pressing the whole motif flat.
Use gentle shaping. Blocking should not be used to force a severely distorted foundation into a heart.
Let the piece dry completely before sewing it onto another surface.
Planning a Project Around the Motif
This heart has shaped edges rather than four equal sides, so it is not a direct substitute for a standard square in a blanket layout.
For an appliqué, position the completed heart on the background and sew around the outer edge with small stitches. Keep the sewing tension relaxed so the background does not pucker.
For a multi-motif project, arrange finished samples first. Joining hearts into a continuous fabric may require connecting sections or a separate background; no joining layout is included here.
A cushion panel, bag front, or flat decorative textile provides a straightforward surface for showing the raised flower.
A Few Questions Worth Checking
Why Does the Motif Begin as a Square?
The granny foundation provides four clear corners. Two adjacent sides receive the upper shells, while the opposite corner supplies the lower point.
Is the Popcorn’s Securing Chain a Space?
No. The ch 1 used to close the popcorn belongs to that stitch. The two chains made afterward form the space used in Round 3.
Why Are the Lobes Worked into Spaces Instead of Individual Stitches?
Each group of eleven treble crochets is concentrated in one marked side space to create a rounded shell. Working those stitches across the side would produce a different shape.
Can I Use Fewer Colors?
Yes. You can keep the popcorns and background distinct while using the same color for the center and outline. Mark the round transitions carefully if color changes no longer identify them.
Keep the First Sample as Your Reference
Record the yarn, hook, width across the lobes, and height from the top indentation to the bottom point.
Photograph the motif before Round 5 as well as after finishing. Seeing the square foundation beside the completed heart makes the shaping easier to understand.
If you share your version of this crochet heart granny motif pattern, include any adjustments to the shell size or outline. Those details help explain how your materials affected the result.