This strawberry garden tote bag crochet pattern combines a plain single crochet body with red strawberry appliqués and green leafy tops. The neutral background leaves room for the fruit motifs to stand out, while the separate decorations let you arrange the strawberries before sewing them in place.
The bag begins with an oval base worked around a foundation chain. Joined rounds form the sides, two separately crocheted handles complete the opening, and flat strawberry motifs provide the decoration.
Read the base instructions carefully before starting. The increases are concentrated at the rounded ends, while the two straight sections retain the same number of stitches.
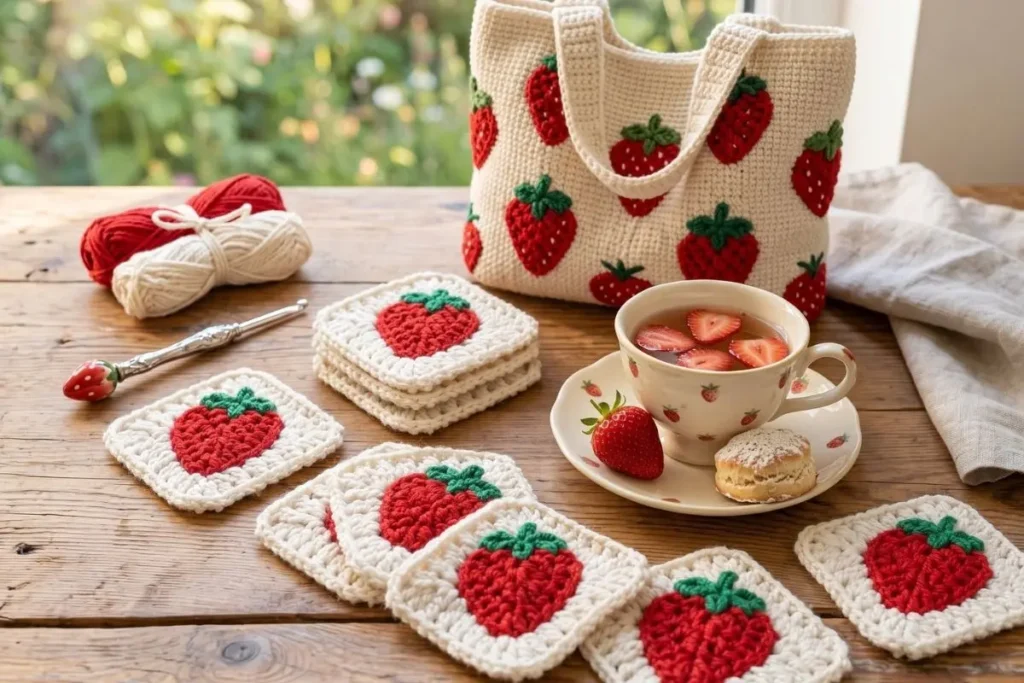
Materials for the Strawberry Garden Tote Bag Crochet Pattern
Yarn and Hook
- Worsted-weight cotton yarn in natural or your preferred main color.
- Red cotton yarn for the strawberries.
- Green cotton yarn for the leafy tops.
- Cream embroidery floss for the seeds.
- A 3.5 mm crochet hook as a starting point.
Use the same yarn weight for the bag and appliqués unless you deliberately want to change the scale of the decorations.
The main color accounts for most of the yarn used. Total quantities depend on your yarn, tension, handle length, and number of motifs.
Other Supplies
- Stitch markers.
- Scissors.
- A tapestry needle.
- An embroidery needle suitable for your floss.
- A measuring tape.
- Pins or removable markers for positioning the appliqués and handles.
Size, Tension, and Planning
Make a single crochet swatch before starting. Check that the fabric feels comfortable to work and has the firmness you want for the bag.
Wash and dry the swatch according to the yarn label, then measure the stitches and rows across its central area.
The body contains 128 stitches around. As a rough planning calculation, half the circumference gives the flattened width.
For example, at 22 sc per 4 inches, a 128-stitch circumference gives a flattened width of approximately 11.6 inches. This is a calculation from stitch gauge, not a finished measurement.
The handles begin with 80 stitches. At that same stitch gauge, their length would be approximately 14.5 inches before allowing for the sections sewn onto the bag.
Measure your own work and decide whether this produces the size and handle length you want before continuing.
Calculate Height and Handle Clearance
Rounds 4–64 contain 61 rounds of 128 stitches. For a rough height estimate, divide 61 by the number of rows in your swatch, then multiply by the measured swatch height. The oval base and its turn into the sides affect the final measurement, so confirm the height on the actual bag.
For example, a hypothetical gauge of 24 rows per 4 inches gives about 10.2 inches for those 61 rounds. This is a planning example, not a measured sample. If an 80-stitch handle measures 14.5 inches and each end overlaps the bag by 2 inches, about 10.5 inches of handle remains outside the attachments. That length follows the curve of the handle; it is not the vertical handle drop.
Estimate Main-Color Yarn from Your Own Swatch
The written version uses 366 single crochets in base Rounds 1–3, 7,808 in Rounds 4–64, and 960 across the two handles: 9,134 main-color single crochets in total. Foundation chains, joining stitches, sewing tails, and decorations are additional.
If you have a scale sensitive enough to weigh a swatch, count its single crochets and weigh the dry swatch without a label or hook. Divide its weight by its stitch count, then multiply by 9,134 for an approximate main-color starting estimate. Allow additional yarn for chains, joins, assembly, and variation between the swatch and project. Do not treat this as a tested yarn requirement. Estimate red and green separately after making one complete motif.
Abbreviations and Terms
This pattern uses US crochet terminology.
- ch: chain.
- sl st: slip stitch.
- sc: single crochet.
- hdc: half double crochet.
- inc: work 2 sc into the same stitch.
- sc2tog: single crochet two stitches together.
- BLO: back loop only.
- st / sts: stitch / stitches.
- MR: magic ring.
- FO: fasten off.
To work sc2tog, insert the hook into the next stitch and pull up a loop. Insert it into the following stitch and pull up another loop. Yarn over and draw through all three loops on the hook.
For a reference to standard abbreviations and differences between US and UK terms, consult the Craft Yarn Council’s crochet abbreviation guide.
Strawberry Garden Tote Bag Crochet Pattern: Construction Notes
- Work the base and body in joined rounds without turning.
- Beginning ch-1 stitches do not count as stitches.
- Join each round with a sl st to the first actual sc.
- Begin the next round in the same stitch at the base of the ch-1.
- Do not work into the joining slip stitch.
- Work through both loops unless BLO is specified.
- Work the handles and strawberry bodies in turned rows.
- Sew the decorations and handles onto the completed bag before adding any optional lining.
Mark the first stitch of each round. Additional markers at the ends of the straight base sections will help you track the increases.
Step 1: Crochet the Oval Base
With the main color, ch 58.
Round 1 — 116 Stitches
Work 3 sc into the second chain from the hook.
Work 1 sc into each of the next 55 chains.
Work 3 sc into the final chain.
Rotate the foundation chain so you can work along its unused side. Do not turn the fabric over.
Work 1 sc into each of the next 55 unused chain positions, returning toward the starting end.
Do not add more stitches into the chain that already holds the first three sc.
Join with a sl st to the first sc.
Count: 116 sc.
The round contains:
- Three stitches at the first rounded end.
- Fifty-five stitches along the first straight side.
- Three stitches at the second rounded end.
- Fifty-five stitches along the second straight side.
Round 2 — 122 Stitches
Ch 1.
Work an inc into each of the first three stitches.
Work 1 sc into each of the next 55 stitches.
Work an inc into each of the next three stitches.
Work 1 sc into each of the remaining 55 stitches.
Join with a sl st to the first sc.
Count: 122 sc.
Each rounded end now contains six stitches. The straight sections still contain 55 stitches each.
Round 3 — 128 Stitches
Ch 1.
Across the first six-stitch rounded end, repeat 1 sc in the next stitch, inc in the following stitch three times.
Work 1 sc into each of the next 55 stitches.
Across the second rounded end, repeat 1 sc in the next stitch, inc in the following stitch three times.
Work 1 sc into each of the remaining 55 stitches.
Join with a sl st to the first sc.
Count: 128 sc.
Each rounded end now contains nine stitches.
Lay the base on a level surface and check the shape. Confirm all counts before beginning the sides.
Round 4 — Begin the Sides
Ch 1.
Working in BLO, work 1 sc into each stitch around.
Join with a sl st to the first sc.
Count: 128 sc.
This round introduces a change in direction between the base and the bag sides.
Base Stitch Map
Place markers at the boundaries between each rounded end and the straight sides. Follow the four sections in this order; the table counts completed stitches, not the number of foundation chains.
| Round | First end | First side | Second end | Return side | Total |
|---|---|---|---|---|---|
| 1 | 3 | 55 | 3 | 55 | 116 |
| 2 | 6 | 55 | 6 | 55 | 122 |
| 3 | 9 | 55 | 9 | 55 | 128 |
| 4 | 9 | 55 | 9 | 55 | 128, all BLO |
Round 2 adds three stitches at each end. Round 3 also adds three at each end. Neither round adds stitches to a straight side.
Visual Guide: Oval Base Counts
Use markers to separate the two rounded ends from the straight sides. The oval is a section map, not a drawing of all individual stitches or a scale model of the finished base.
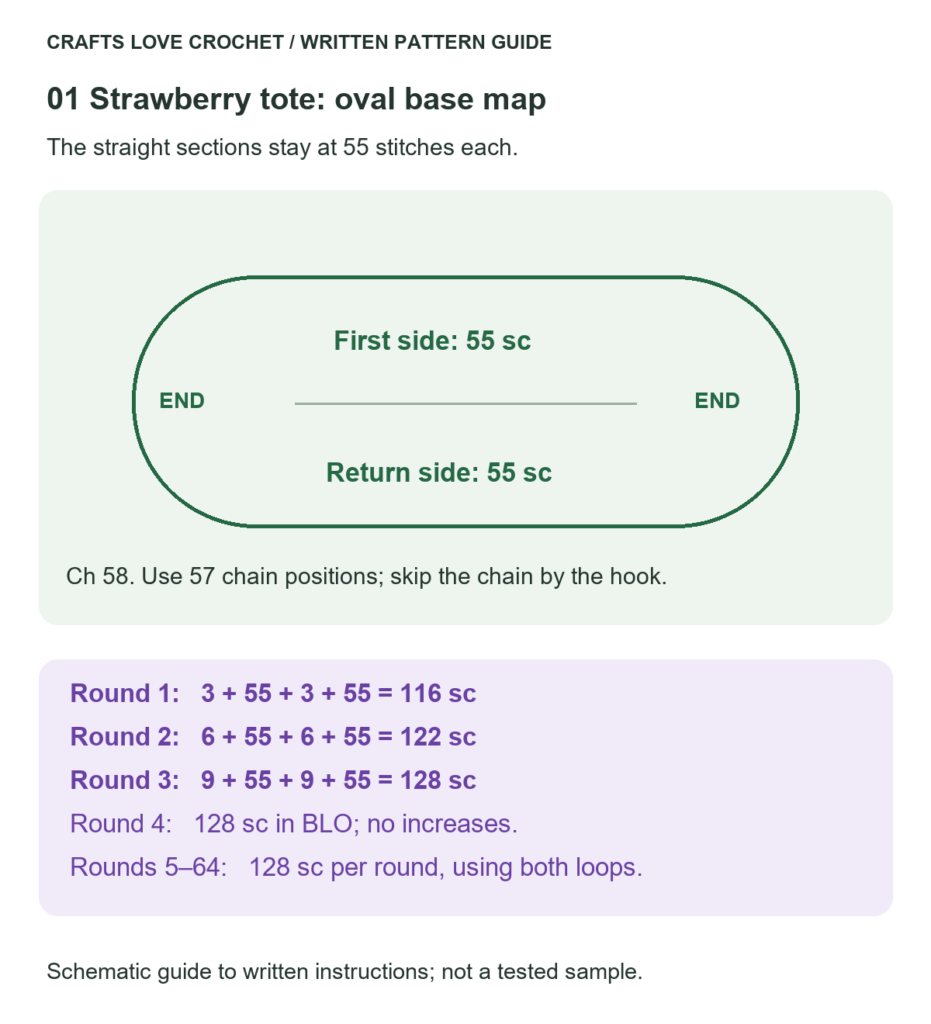
Open this diagram at a larger size.
Step 2: Work the Bag Body
Rounds 5–60
For each round:
- Ch 1.
- Work 1 sc into each stitch around, using both loops.
- Join with a sl st to the first sc.
Count: 128 sc in every round.
Do not increase or decrease.
Check the count periodically, particularly near the join. Accidentally working into the slip stitch can add a stitch and gradually widen the body.
Measure the height as you work. If you adjust the number of body rounds, record the change before proceeding to the final four rounds.
Step 3: Finish the Top Edge
Rounds 61–64
Ch 1 and work 1 sc into every stitch around.
Join each round with a sl st to the first sc.
Count: 128 sc in every round.
After the fourth top-edge round, fasten off and weave in the end.
These rounds continue the same stitch pattern to create an undecorated area at the opening.
Step 4: Make Two Handles
With the main color, ch 81.
Row 1
Work 1 sc into the second chain from the hook and into each remaining chain.
Count: 80 sc.
Rows 2–6
Ch 1 and turn.
Work 1 sc into every stitch across.
Count: 80 sc in every row.
After Row 6, fasten off, leaving a long sewing tail.
Make the second handle in the same way.
Lay the handles beside one another and compare their length and width without stretching them.
Adjusting Handle Length
For a longer handle, increase the starting chain. For a shorter handle, reduce it.
The stitch count in each row will be one less than the starting chain count.
Make both handles with the same count, and remember that part of each end will be sewn onto the bag.
Step 5: Crochet the Strawberry Appliqués
Make one complete strawberry first and check its size against the bag.
A starting layout is 12 motifs, divided between the front and back. Adjust the number after arranging the first sample rather than assuming a fixed spacing will fit.
The red body is worked flat from the narrow lower end toward the top.
Row 1 — 2 Stitches
With red, ch 3.
Work 1 sc into the second chain from the hook and 1 sc into the final chain.
Count: 2 sc.
Row 2 — 4 Stitches
Ch 1 and turn.
Work an inc into each stitch.
Count: 4 sc.
Row 3 — 6 Stitches
Ch 1 and turn.
Inc in the first stitch, work 1 sc into each of the next two stitches, then inc in the final stitch.
Count: 6 sc.
Row 4 — 8 Stitches
Ch 1 and turn.
Inc in the first stitch, work 1 sc into each of the next four stitches, then inc in the final stitch.
Count: 8 sc.
Row 5 — 10 Stitches
Ch 1 and turn.
Inc in the first stitch, work 1 sc into each of the next six stitches, then inc in the final stitch.
Count: 10 sc.
Rows 6–8 — 10 Stitches
Ch 1 and turn at the beginning of each row.
Work 1 sc into every stitch across.
Count: 10 sc in each row.
Row 9 — 8 Stitches
Ch 1 and turn.
Sc2tog, work 1 sc into each of the next six stitches, then sc2tog.
Count: 8 sc.
Row 10 — 6 Stitches
Ch 1 and turn.
Sc2tog, work 1 sc into each of the next four stitches, then sc2tog.
Count: 6 sc.
Fasten off, leaving a long tail for sewing.
The narrow starting edge forms the bottom of the berry. The final six-stitch edge sits beneath the green top.
Visual Guide: Strawberry Row Counts
Read upward from Row 1. Each red block represents one completed stitch; it is not a standard crochet symbol. Increase at both ends in Rows 2–5, keep Rows 6–8 even, then decrease at both ends in Rows 9–10.
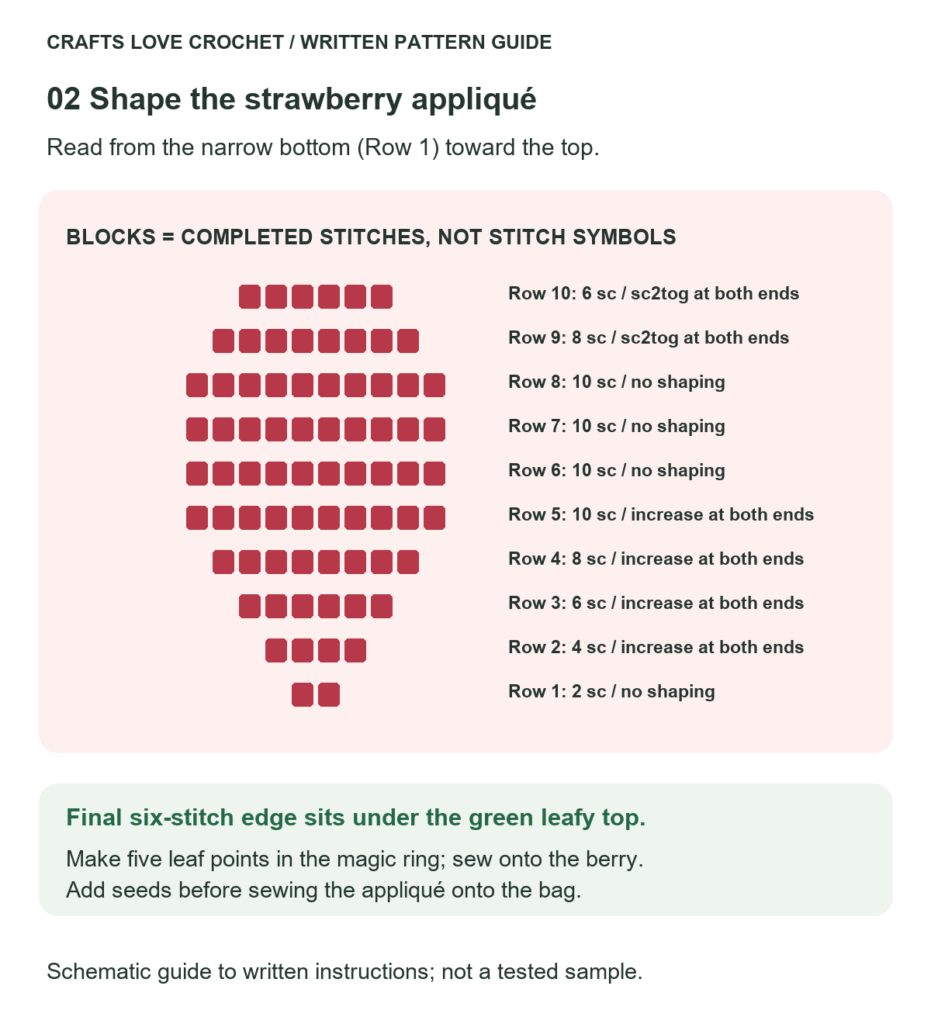
Open this diagram at a larger size.
Step 6: Make the Green Strawberry Tops
Make one leafy top for each red berry.
With green, make an MR.
Work the following sequence five times:
- Ch 4.
- Sl st into the second chain from the hook.
- Work 1 sc into the next chain.
- Work 1 hdc into the final chain.
- Sl st into the MR.
Count: five leaf points.
Tighten the ring and fasten off, leaving a sewing tail.
Position the green piece over the upper edge of the red berry. Arrange the leaf points and sew the center securely in place. Add small holding stitches where needed to keep the leaves from lifting.
Step 7: Embroider the Seeds
Using cream embroidery floss, add short individual stitches across the red surface.
Space them apart and keep them clear of the outer sewing edge. Add only as many as fit comfortably on your motif.
Avoid pulling the floss tight enough to pucker the crochet.
Secure the floss on the reverse before attaching the strawberry to the bag.
Assembling the Strawberry Garden Tote Bag Crochet Pattern
Position the Handles
Lay the bag flat and mark the two side folds.
Center one handle on the front and the other on the back. Check that their attachment points mirror each other and that neither handle is twisted.
Overlap each handle end onto the bag by approximately 2 inches as an initial placement. Check the remaining handle opening before sewing; short handles may require a different starting length.
Keep the ends clear of the side folds and leave space for the appliqués.
Using matching yarn, sew around each overlapped end to form a rectangle. Add diagonal stitches across that rectangle to form an X.
Distribute the sewing through multiple rows and stitches of the bag fabric rather than concentrating the attachment along the top edge alone.
Arrange the Strawberries
Pin the completed motifs onto the bag.
For a 12-motif layout, try two strawberries across each of three rows on the front, then repeat on the back. Adjust the arrangement to fit your actual bag and motif measurements.
Leave clear space around the handle attachments and bottom fold.
Slip a piece of cardboard inside the bag while sewing so you do not accidentally stitch the front and back together.
Whipstitch around each red motif with its sewing tail, keeping the tension gentle enough to avoid puckering the bag.
Secure all ends on the inside.
Practical Tips
Keep the Base Sections Marked
The straight sides remain at 55 stitches throughout the three base rounds. The rounded ends grow from three to six to nine stitches each.
If the total is wrong, count those sections separately to locate the error.
Check the Join Before Adding Another Round
The first sc belongs in the stitch at the base of the beginning chain. The joining slip stitch is not an additional stitch.
Sample One Strawberry Before Making the Set
Check the red shape, leafy top, and seed spacing together. This allows you to adjust the motif layout before making all the decorations.
Match the Handles Before Sewing
Small tension differences can produce unequal handles even when the stitch counts match. Compare both pieces flat and unstretched.
Check the Attachments in Use
Begin with a light load and inspect the handle seams for distortion or loose stitches. Reinforced sewing does not establish a specific carrying capacity.
Finishing and Optional Lining
Weave in the remaining ends and inspect the appliqué edges and handle attachments.
Follow the yarn label when washing or blocking. Let the bag dry completely before measuring it for a lining.
A fabric lining can help keep small items from catching in the crochet. Fit it to the actual finished interior so it does not pull the bag out of shape.
A lining does not automatically prevent stretching or make the handles suitable for heavy loads.
Frequently Asked Questions
Is This Strawberry Garden Tote Bag Crochet Pattern Suitable for Beginners?
The stitches are mostly single crochet, but the oval increases, decreases, embroidery, and handle assembly require careful counting. Familiarity with those techniques will make the instructions easier to follow.
How Many Stitches Should the Body Have?
The body has 128 stitches in every round. The base progresses through 116, 122, and 128 stitches before the back-loop-only round.
Why Is My Bag a Different Size?
Yarn thickness, hook size, and tension affect the measurements. The stitch count defines the construction, but it does not produce the same dimensions with every yarn.
Can I Make Longer Handles?
Yes. Increase the starting chain and use the same new stitch count for both handles. Allow for the sections that will be sewn onto the bag.
Do I Need Exactly 12 Strawberries?
No. Make one complete motif, compare it with the bag, and choose a layout that leaves room around the handles and base. Fewer motifs or decoration on only one side are also options.
More Crochet Accessories to Explore
For a small floral detail to accompany your bag, explore our Crochet Sunflower Keychain Pattern, which combines a brown center, yellow petals, and a green leaf.
You can also browse our crochet accessories collection for other appliqués, keychains, and decorative projects.
Share Your Strawberry Tote
If you try this strawberry garden tote bag crochet pattern, share your yarn, hook size, finished measurements, and any adjustments you made.
Details about handle length and strawberry placement are especially helpful for readers planning their own version.