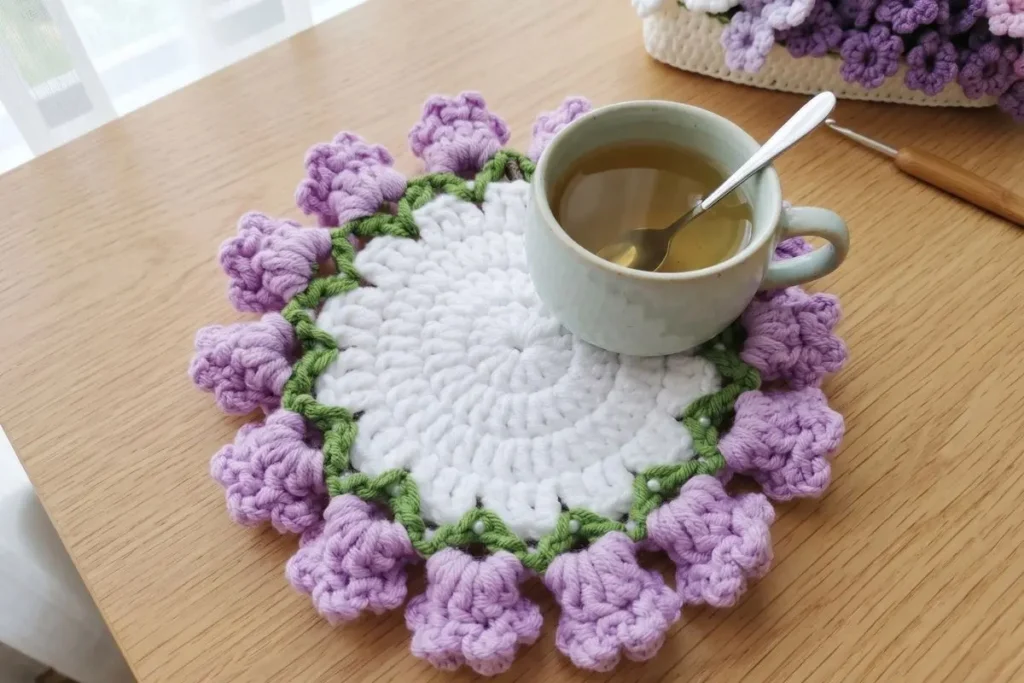
There’s something incredibly satisfying about finishing a floral doily and watching it transform a simple table into something warm and inviting. I’ve made this Crochet Lavender Bell Flower Doily Pattern several times, experimenting with different cotton yarns and color combinations, and every version has its own unique charm.
One thing I especially enjoy about this design is how naturally it grows from the center outward. The smooth circular base keeps the project relaxing, while the leafy edging and delicate lavender flowers make the final rounds feel especially rewarding. During testing, I found that keeping an even tension while crocheting the petals helped them open beautifully after blocking, giving each flower a soft, realistic appearance.
Whether you’re making it for your own dining table, a thoughtful handmade gift, or even to sell at local craft fairs, this elegant floral doily creates a timeless piece that you’ll be proud to display.
Skill Level
Intermediate
Finished Size
Approximately 9–10 inches (23–25 cm) in diameter, depending on yarn and individual tension.
What You’ll Need
Materials
- Worsted Weight Cotton Yarn (#4)
- White (Center)
- Sage Green (Leaves)
- Lavender (Flowers)
- 3.5 mm (E/4) crochet hook
- Tapestry needle
- Scissors
- Stitch markers (optional)
Crochet Abbreviations (US Terms)
- ch – chain
- sl st – slip stitch
- sc – single crochet
- hdc – half double crochet
- dc – double crochet
- tr – treble crochet
- inc – increase
- st – stitch
- sp – space
- rep – repeat
- BLO – back loop only
- FLO – front loop only
- RS – right side
- WS – wrong side
Pattern Notes
- The doily is worked in joined rounds.
- Join each round with a slip stitch unless otherwise stated.
- Chain stitches at the beginning of rounds do count as stitches when specified.
- Flowers are crocheted directly onto the border.
- Keep your tension relaxed when making the petals to achieve their rounded appearance.
Color Sequence
- Rounds 1–6: White
- Round 7: Green
- Round 8: Lavender
Step-by-Step Pattern
Round 1
With White,
Make a Magic Ring.
Ch 3.
Work 15 dc into the ring.
Join with a sl st to top of beginning ch-3.
(16 dc)
Round 2
Ch 3.
Work 2 dc in every stitch around.
Join.
(32 dc)
Round 3
Ch 3.
1 dc in next st, 2 dc in next st.
Repeat around.
Join.
(48 dc)
Round 4
Ch 3.
1 dc in next 2 sts, 2 dc in next st.
Repeat around.
Join.
(64 dc)
Round 5
Ch 1.
Work 1 sc in every stitch around.
Join.
(64 sc)
Round 6
Ch 3.
Work 1 dc in every stitch around.
Join.
(64 dc)
The center should now lay completely flat.
Leaf Border
Change to Green.
Round 7
Ch 1.
*Sc in next st.
Ch 3.
Skip 1 st.
Sc in next st.
Ch 3.*
Repeat around.
Join.
You should have 32 chain spaces.
Round 8
Sl st into first ch-3 space.
Work in each chain space:
(sc, hdc, dc, hdc, sc)
Then work
sl st into next sc.
Repeat around.
Join.
This creates the pointed green leaf border.
Lavender Bell Flowers
Change to Lavender.
Each flower is worked around the tip of every green leaf.
Flower
Attach yarn at top of one green point.
Ch 4.
Work into the same space:
5 tr
Ch 2.
Sl st into same space.
Turn slightly.
Again into same space:
Ch 4
5 tr
Ch 2
Sl st
Repeat once more.
You now have 3 rounded petals.
Finish by working:
Ch 2
Sc around the base of the flower.
Fasten off.
Repeat on every green point around the doily.
You should have 16 flowers evenly spaced.
Finishing
Weave in all ends securely.
Lightly block the doily.
Shape each flower by gently curling the petals outward.
Allow to dry completely before use.
My Experience & Practical Tips
After making this Crochet Lavender Bell Flower Doily Pattern more than once, I noticed a few small details that really improve the finished result.
The first is to avoid crocheting the flower petals too tightly. Treble crochet stitches naturally need a little room to create their graceful shape, so relaxing your tension slightly makes a noticeable difference once the doily is blocked.
Another helpful habit is weaving in the yarn tails as you complete each color section instead of saving them all for the end. It keeps the project tidy and prevents accidentally pulling on finished petals while hiding multiple ends later.
If your center starts to ripple, it’s usually caused by inconsistent tension rather than the pattern itself. Laying the work flat every couple of rounds makes it easy to spot small issues before moving on.
Blocking is the step that truly brings this floral design to life. I like to gently pin each leaf and lightly curve every lavender petal outward while the doily dries. The finished flowers look much more defined and elegant.
Finally, if you’re using cotton yarn from different brands, make a small swatch first. Even yarns labeled as worsted weight can vary slightly in thickness, which can affect the final diameter of the doily.
Designer Tips
- Cotton yarn gives the doily crisp stitch definition.
- Blocking dramatically improves the flower shape.
- If you’d like a larger centerpiece, simply add another increase round before beginning the leaf border.
- Starching the finished piece lightly helps the flowers stand upright.
Customization Ideas
This Crochet Lavender Bell Flower Doily Pattern is easy to personalize while keeping the same elegant structure.
- Make the flowers in pink, blue, yellow, or ivory.
- Add tiny pearl beads to the center of each flower.
- Use metallic thread for elegant holiday décor.
- Crochet in fine thread with a 1.75 mm hook for a delicate heirloom doily.
Care Instructions
- Hand wash in cool water.
- Lay flat to dry.
- Steam lightly after washing if needed.
- Do not wring the fabric.
Pattern Summary
- Center: Flat circular doily in double crochet.
- Border: Green leaf edging created from chain spaces.
- Flowers: Three-petal lavender bell flowers attached individually around the border.
- Construction: Worked seamlessly from the center outward with no sewing required.
Frequently Asked Questions
Is this Crochet Lavender Bell Flower Doily Pattern suitable for beginners?
This project is best suited for intermediate crocheters because it combines multiple stitch heights, joined rounds, and decorative floral edging.
Can I use crochet thread instead of worsted cotton?
Yes. Using finer crochet thread with a smaller hook creates a more delicate heirloom-style doily while maintaining the same construction.
Why should I block the finished doily?
Blocking helps flatten the center, define the leaf edging, and open the lavender petals so the floral design is clearly visible.
Can I make the flowers in different colors?
Absolutely. Soft pinks, blues, ivory, peach, or even seasonal shades create beautiful variations without changing the overall design.
Is this doily suitable as a handmade gift?
Yes. Its elegant floral appearance makes it a lovely gift for birthdays, Mother’s Day, weddings, housewarmings, or anyone who appreciates handmade home décor.
You May Also Enjoy
If you love creating beautiful crochet projects that are both decorative and practical, there are plenty of fun designs to explore next. The Crochet Sunflower Keychain is a quick and cheerful project that’s perfect for using up leftover yarn and making thoughtful handmade gifts. If you’re looking for something both stylish and functional, the Strawberry Garden Tote Bag offers a charming way to carry your crochet essentials or everyday items. And when the holiday season arrives, the Crochet Star Snowflake Wreath Ornament is a wonderful choice for adding a handmade touch to your festive decorations with elegant winter-inspired details.
Conclusion
I always enjoy coming back to this Crochet Lavender Bell Flower Doily Pattern because it combines relaxing stitch work with beautiful finishing details that make every completed piece feel special. After testing the design several times, I’ve found it to be a reliable project that blocks beautifully and holds its shape well when made with quality cotton yarn.
Whether you’re creating a timeless centerpiece for your own home, preparing thoughtful handmade gifts, or adding elegant pieces to your next craft fair collection, this floral doily is one of those projects that never goes out of style. Take your time with the finishing touches, enjoy watching the flowers bloom around the border, and you’ll have a handmade keepsake you’ll be proud to display for years.
Loved this pattern? Share it with your crochet friends and inspire someone else to create their own beautiful floral doily!