This crochet frilly heart applique pattern combines a dark pink heart with a lighter scalloped border. The contrast separates the center from the decorative edge, making the shape easier to see when the motif is sewn onto a bag, cushion cover, or another crochet project.
The heart begins in a magic ring. A counted single crochet round defines its outline, then three scallops are added along each side. The bottom point is worked separately so the border does not replace it with another rounded shell.
Before adding the second color, take a moment to count the outline and mark the bottom point. Those two checks determine where every scallop will sit.

Materials for the Crochet Frilly Heart Applique Pattern
- Worsted-weight cotton yarn in dark pink for Color A.
- Worsted-weight cotton yarn in light pink for Color B.
- A 4.0 mm crochet hook as a starting point.
- A tapestry needle.
- Scissors.
- Stitch markers.
- A measuring tape.
- Matching yarn or suitable sewing thread for attaching the finished heart.
Use similar yarn thicknesses for the center and border.
If the appliqué will be sewn onto something washable, choose materials with compatible care instructions.
Finished measurements depend on your yarn, hook, and tension. Make one complete motif and measure it before planning a layout that requires several matching hearts.
Abbreviations and Stitch Notes
This pattern uses US crochet terminology.
- ch: chain.
- sl st: slip stitch.
- sc: single crochet.
- hdc: half double crochet.
- dc: double crochet.
- tr: treble crochet.
- st / sts: stitch / stitches.
- MR: magic ring.
- FO: fasten off.
For a US treble crochet, yarn over twice before inserting the hook.
The Craft Yarn Council’s crochet abbreviation guide provides a reference for these terms and their UK equivalents.
Scallop Used in This Pattern
Work the following seven stitches into the same stitch:
1 sc, 1 hdc, 3 dc, 1 hdc, 1 sc.
The three double crochets are all worked into that same stitch. Do not distribute them across three separate stitches.
Crochet Frilly Heart Applique Pattern: Construction Notes
Work with the same side facing throughout. Do not turn between rounds.
The starting and ending ch-3 sections in Round 1 help form the upper curves. They are not included in the count of the 15 main stitches.
In Round 2, work around those chain sections rather than into each individual chain.
The single crochet outline contains:
- Fifteen stitches along the first side.
- One marked stitch at the bottom point.
- Fifteen stitches along the second side.
The joining slip stitch at the top indentation is not included in the 31-stitch outline.
The final border uses three five-stitch repeats on each side. The marked point is worked separately.
Part 1: Make the Heart Center
Round 1 — Color A
Make an MR.
Work the following sequence into the ring:
- Ch 3.
- Work 3 tr.
- Work 4 dc.
- Work 1 tr for the bottom point.
- Work 4 dc.
- Work 3 tr.
- Ch 3.
- Sl st into the ring.
All the stitches in this round are worked into the same ring.
Count: 15 main stitches, plus the two ch-3 sections and the closing slip stitch.
The stitch count is:
3 tr + 4 dc + 1 tr + 4 dc + 3 tr = 15 stitches.
Tighten the magic ring gently to close the center.
Identify and mark the single tr between the two groups of four dc. This is the bottom-point stitch.
The closing slip stitch sits at the top indentation between the two lobes.
Do not fasten off.
Part 2: Define the Heart Outline
Round 2 — Color A
Sl st into the space beneath the starting ch-3 section.
Ch 1. This chain does not count as a stitch.
Work around the heart in this order:
- Work 4 sc around the starting ch-3 section.
- Work 2 sc into each of the next three tr.
- Work 1 sc into each of the next four dc.
- Work 3 sc into the marked bottom tr.
- Work 1 sc into each of the next four dc.
- Work 2 sc into each of the next three tr.
- Work 4 sc around the ending ch-3 section.
Finish with a sl st into the closing slip stitch from Round 1 at the top indentation.
Count: 31 sc, excluding the joining slip stitch.
Mark the middle stitch of the three sc worked into the bottom point. This is stitch 16 of the outline.
Fasten off Color A.
Check the Outline
Beginning with the first sc worked around the starting chain section, count:
- Fifteen sc before the marked point.
- The marked point itself.
- Fifteen sc after the marked point.
The outline calculation is:
4 + 6 + 4 + 3 + 4 + 6 + 4 = 31 sc.
If the count differs, correct the outline before joining Color B.
Place the heart on a level surface and inspect the two upper lobes and the bottom point. Avoid stretching the fabric to disguise a placement error.
Part 3: Add the Scalloped Border
Join Color B
With the front of the heart facing you, join Color B with a sl st into the top indentation where Round 2 ended.
Ch 1. This chain does not count as a stitch.
Begin working into the first sc of the 31-stitch outline. Do not work an additional border stitch into the attachment point at the indentation.
Visual Guide: One Five-Stitch Scallop Repeat
The numbers here describe positions within one repeat, not the full outline. All seven scallop stitches go into position 3. Keep the two slip stitches at a boundary in separate base stitches.
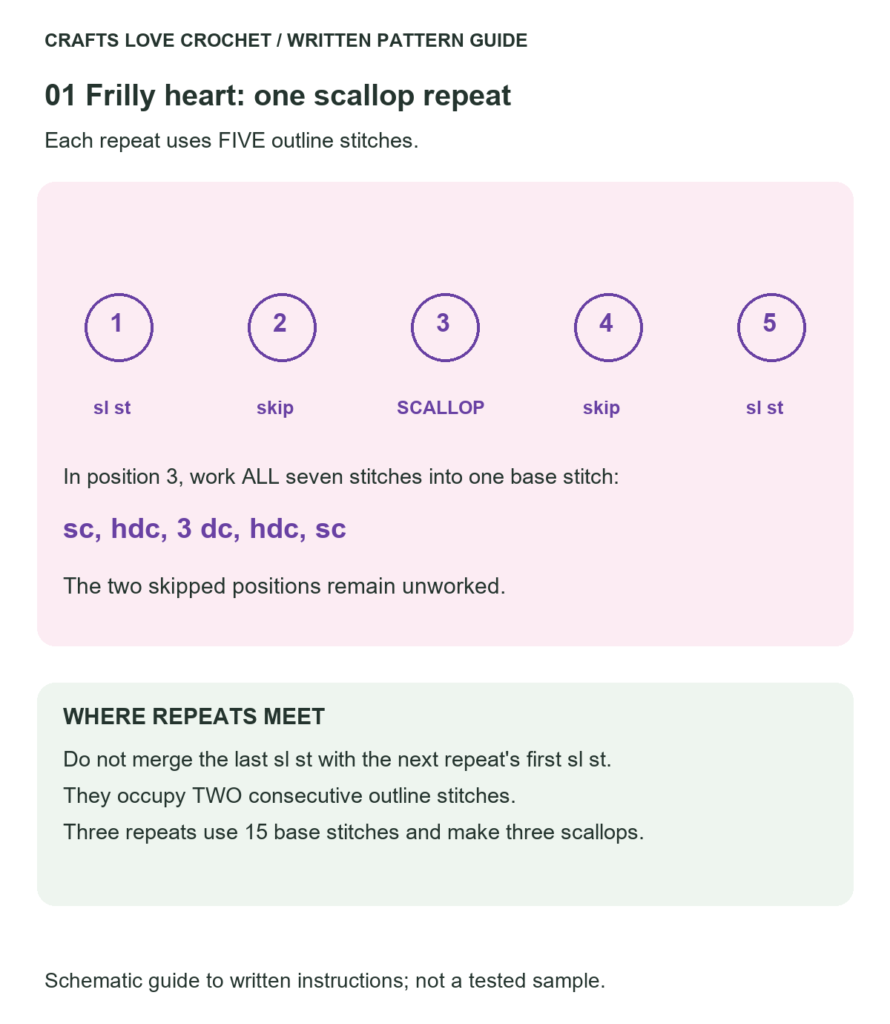
Open this guide at a larger size.
First Side — Three Scallops
Work this five-stitch sequence three times:
- Sl st into the next stitch.
- Skip the next stitch.
- Work 1 sc, 1 hdc, 3 dc, 1 hdc, 1 sc into the next stitch.
- Skip the next stitch.
- Sl st into the next stitch.
Each repeat uses five stitches from the outline.
After three repeats, you will have used the first 15 outline stitches and made three scallops.
The next stitch should be the marked bottom point.
Bottom Point
Work 3 sc into the marked stitch.
Move the marker to the middle of these three new stitches if you want to keep track of the point during finishing.
Second Side — Three Scallops
Repeat the same five-stitch sequence three more times:
- Sl st into the next stitch.
- Skip the next stitch.
- Work 1 sc, 1 hdc, 3 dc, 1 hdc, 1 sc into the next stitch.
- Skip the next stitch.
- Sl st into the next stitch.
These repeats use the remaining 15 stitches of the outline.
Join with a sl st to the Color B attachment slip stitch at the top indentation.
Fasten off.
Border total: six scallops, with three on each side, plus a three-sc bottom point.
Do not add a scallop across the top indentation. Keeping that area low helps distinguish the two lobes.
Border Placement Check
If you number the 31 outline stitches, the scallops are worked into:
Stitches 3, 8, 13, 19, 24, and 29.
The bottom-point group is worked into stitch 16.
This placement mirrors the scallops across the two sides of the heart.
The raised border is intended to have more fullness than the center. However, the center should not need to be pulled tightly into shape to accommodate it.
Visual Guide: Scallop Positions Around the Heart
Read each numbered row from left to right, then move to the next row. This is a position checklist, not a drawing of the heart shape. Purple positions receive scallops; stitch 16 receives the separate point group.
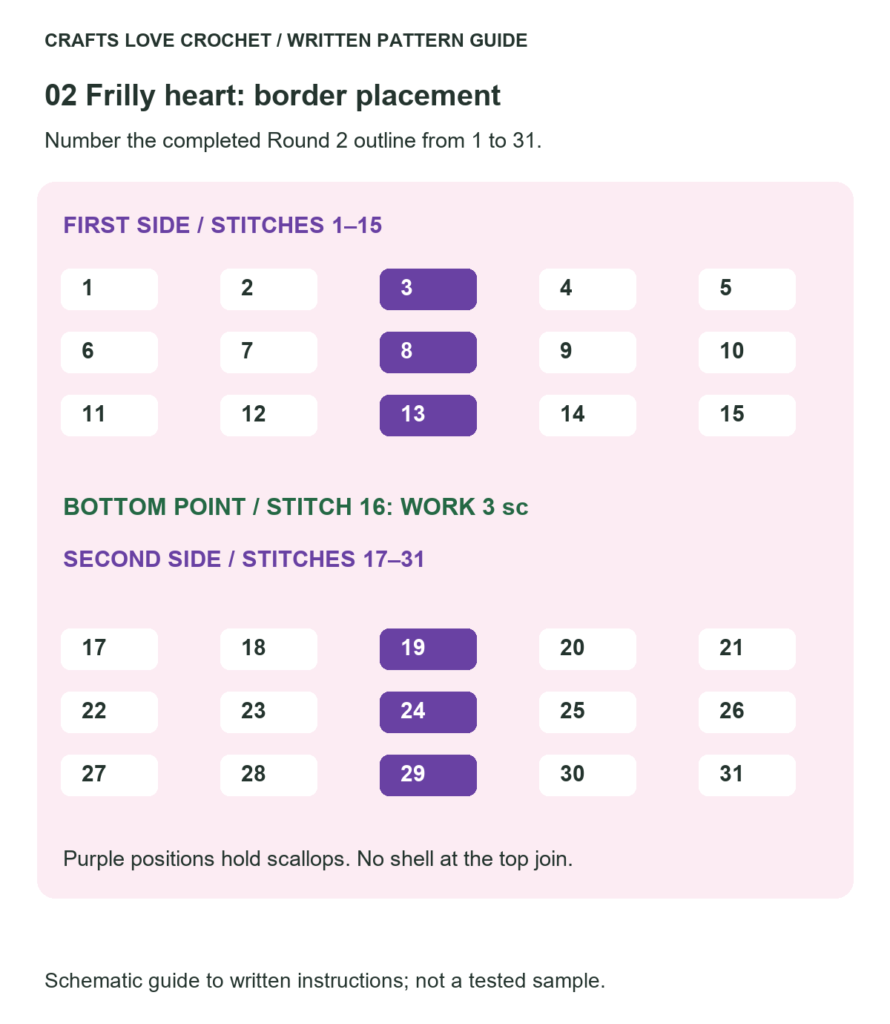
Open this guide at a larger size.
Finishing the Crochet Frilly Heart Applique Pattern
Weave in the magic-ring tail securely on the reverse side. Avoid pulling it so tightly that the center puckers.
Weave in the remaining ends through their corresponding color sections.
Arrange the scallops gently with your fingers and check that the bottom point remains visible.
If blocking, follow the yarn label’s care instructions. Shape the center and border without stretching either section aggressively.
Allow the piece to dry completely before sewing it onto another project.
How to Sew the Heart onto a Project
Position the finished appliqué on the chosen surface and secure it temporarily with pins or removable markers.
If attaching it to a bag, place a piece of cardboard inside to prevent accidentally sewing the front and back together.
Use matching yarn or sewing thread to make small stitches around the outer edge of the Color A heart, just inside the scalloped border.
Attach the center securely while leaving the outer scallops free if you want them to retain their raised appearance.
Add a small holding stitch at the top indentation and bottom point if needed. Check the front regularly so the sewing does not distort the shape.
Secure the thread on the reverse and remove all positioning pins.
Practical Tips
Mark the Bottom Point Early
In Round 1, the bottom point is the single tr between the two groups of four dc.
In Round 2, it becomes the middle sc of the three-sc group. Marking both stages prevents confusing the point with a neighboring stitch.
Count the Chain-Section Stitches Separately
Each ch-3 section receives four sc in Round 2. Work around the chain section as a unit rather than trying to place one stitch into each chain.
Keep the Scallop Repeats Separate
Each border repeat begins and ends with a slip stitch. Where two repeats meet, there will be slip stitches in two consecutive outline stitches.
Do not merge those into one stitch; doing so changes the placement of the next shell.
Preserve the Top Indentation
Keep the joining stitches neat, but do not pull them hard enough to gather the center. No scallop is added across the indentation.
Make One Complete Heart Before Starting a Set
Check the final dimensions and border fullness with your selected yarns. If you need several matching motifs, record the yarn, hook, and measurements from that first piece.
Color and Project Ideas
A dark center with a pale border makes the two sections easy to distinguish. You can also reverse the colors or use one shade throughout for a more subtle edge.
For a bag decoration, compare the finished heart with the available space before attaching it. Keep the motif clear of handles, closures, and areas that fold frequently.
Several hearts can also be arranged across a cushion cover or another flat textile surface. Position the full set before sewing so the spacing remains consistent.
Frequently Asked Questions
Is This Crochet Frilly Heart Applique Pattern Suitable for Beginners?
It is most suitable for crocheters who can identify stitch tops and work single, half double, double, and treble crochet. The shaping requires careful placement, especially around the chain sections and bottom point.
How Many Scallops Should the Border Have?
There are six scallops: three on each side. The bottom point is a separate three-sc group, and the upper indentation has no scallop.
Why Does My Border Finish Before I Reach the Top?
Check that Round 2 contains 31 sc and that each scallop repeat uses exactly five outline stitches. Remember that the two slip stitches between neighboring repeats occupy separate stitches.
Should the Border Lie Completely Flat?
The border is intended to be fuller than the center. Gentle lifting is different from the whole heart folding or being pulled inward. If the center is distorted, check the counts and stitch placement before blocking.
Can I Change the Size?
A different yarn weight and suitable hook can change the size, but the border may behave differently too. Make a complete sample before choosing materials for a matching set.
More Crochet Embellishment Ideas
If you enjoy decorating bags with separate motifs, explore our Strawberry Garden Tote Bag Crochet Pattern, which includes instructions for arranging and sewing appliqués.
For a floral accessory, take a look at the Crochet Sunflower Keychain Pattern, with a contrasting center, individual petals, and a green leaf.
Share Your Heart Color Combination
If you try this crochet frilly heart applique pattern, share your yarn, hook size, finished measurements, and the project you attached it to.
A close-up of the border is especially helpful for showing how your yarn and tension affect the scallops.