The green leaves are easy to overlook at first: they sit behind the pink flower, appearing between the petals as the work opens outward. That overlap is the central detail of this crochet flower doily pattern.
Beyond the flower, chain arches create a lighter border, ending in eight broad petals with small picot tips. The change from a dense center to open spaces gives each section a different role without requiring many colors.
Approach the project in three stages: build the flower, add the leaves, then extend the lace. Pause between stages to inspect the stitch placement and how the fabric rests.

Plan the Colors and Gather Your Materials
Use three colors of worsted-weight cotton yarn:
- Gray: the small center.
- Pink: the inner petals and outer border.
- Green: the leaf layer.
You will also need a 4.0 mm crochet hook as a starting point, a tapestry needle, scissors, stitch markers, and a measuring tape. For blocking, use a suitable surface and rust-resistant pins.
Choose yarns of similar thickness. A noticeably thicker border yarn can change the balance between the center and the outer rounds.
Finished diameter and yarn quantities depend on your materials and tension. Measure the completed sample before planning a particular display space or a matching set.
For a different floral arrangement, the Lavender Bell Flower Doily combines a circular center with individually attached floral details.
How to Read This Crochet Flower Doily Pattern
This version has eight repeating modules. Count the modules as well as the individual stitches: eight inner petals lead to eight leaves, eight lace sections, and eight outer petals.
Work in joined rounds without turning. Keep the same side facing you.
Beginning ch-1 and ch-2 stitches do not count as stitches. Join to the first actual stitch unless another joining point is stated.
The abbreviations use US terminology:
- ch: chain.
- sl st: slip stitch.
- sc: single crochet.
- hdc: half double crochet.
- dc: double crochet.
- st / sts: stitch / stitches.
- sp: space.
- MR: magic ring.
For a terminology reference, including US and UK differences, see the Craft Yarn Council’s crochet abbreviation guide.
A picot in this pattern means: ch 3, then sl st into the first of those three chains.
When several stitches are listed “into the same space,” place the entire group beneath that chain arch.
The Flower: Rounds 1–4
Round 1 — Gray Center
Make an MR.
Ch 1 and work 8 sc into the ring. Tighten the ring and join with a sl st to the first sc.
Count: 8 sc.
Fasten off gray.
Round 2 — Eight Pink V-Stitches
Join pink in any stitch.
Ch 2, then work 1 dc, ch 2, 1 dc into that same stitch.
Work 1 dc, ch 2, 1 dc into each remaining stitch around.
Join with a sl st to the first actual dc.
Count: 16 dc and eight ch-2 spaces.
Do not fasten off.
Round 3 — Widen the Petal Bases
Sl st into the first ch-2 space.
Ch 2, then work 2 dc, ch 2, 2 dc into that space.
Work the same group into each remaining ch-2 space. Skip the dc stitches between spaces.
Join with a sl st to the first dc.
Count: 32 dc and eight ch-2 spaces.
Each four-dc group is one petal base.
Round 4 — Shape the Inner Petals
Sl st across to the first ch-2 space.
Ch 1. Into that space, work:
1 sc, 1 hdc, 3 dc, 1 hdc, 1 sc.
Work the same seven-stitch group into each remaining ch-2 space. Do not work into the dc stitches between spaces.
Join with a sl st to the first sc.
Count: eight petals, with seven stitches per petal.
Fasten off pink.
Check before continuing: identify the four dc beneath each petal from Round 3. The next round uses one of those stitches as an anchor; it does not attach to the tip of the pink petal.
The Green Layer: Rounds 5–6
Round 5 — Arches Behind the Flower
Lift the pink petals gently.
Identify the first dc of each four-dc group from Round 3, following the direction in which you crocheted. Mark these eight stitches.
Join green through both top loops of one marked dc. Ch 1 and work 1 sc into that same stitch.
Ch 5, keeping the chain behind the pink petal.
Work 1 sc into the next marked dc.
Continue around, making a ch-5 arch between consecutive marked stitches.
After the eighth arch, join with a sl st to the first green sc.
Count: eight sc anchors and eight ch-5 arches.
Round 6 — Leaves
Sl st into the first ch-5 arch.
Ch 1, then work the following into that arch:
1 sc, 2 hdc, 3 dc, 2 hdc, 1 sc.
Sl st into the next green sc anchor.
Repeat around, placing one nine-stitch leaf into each arch and one separating sl st into the following anchor.
After the final separator, join to the first sc of the first leaf.
Count: eight leaves, containing 72 leaf stitches, plus eight separating slip stitches.
Fasten off green.
Arrange the pink petals in front of the green layer. Check that no supporting chain has crossed over the flower face.
Visual Guide: Connecting the Eight Floral Modules
These checkpoints identify the specific stitches supporting each new layer, rather than the petal tips.
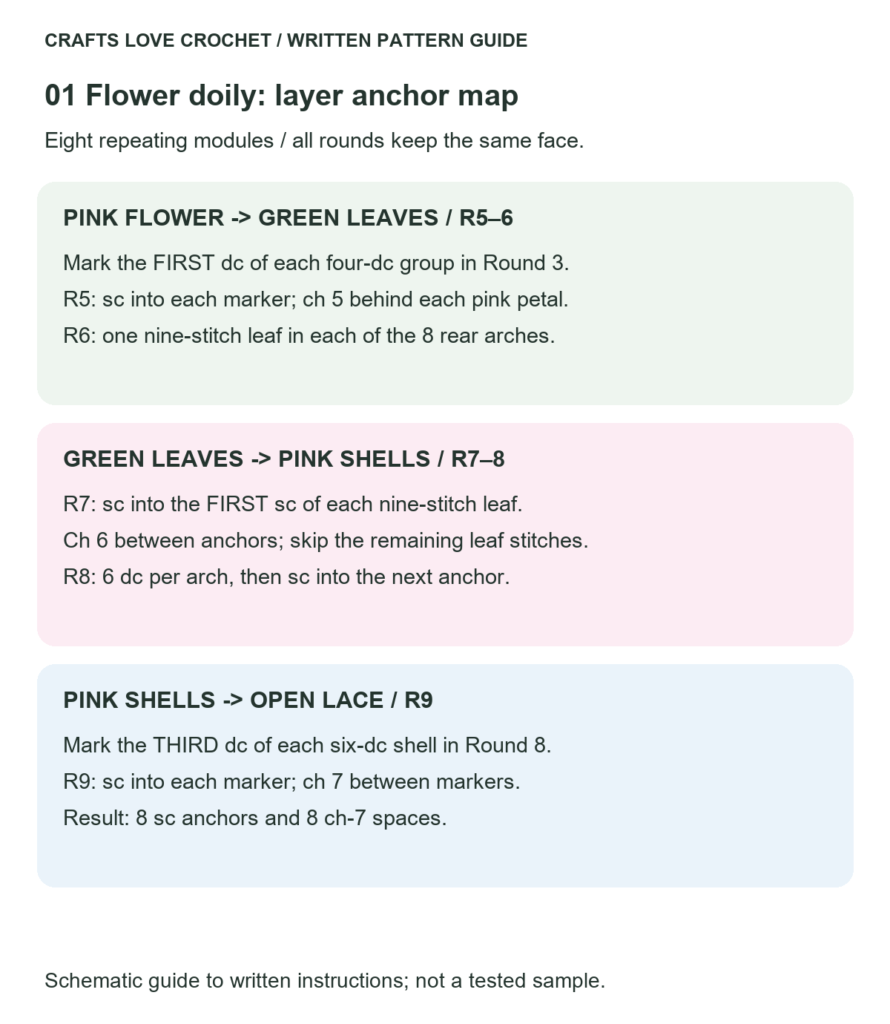
Open this guide at a larger size.
Extending the Crochet Flower Doily Pattern: Rounds 7–11
Round 7 — Pink Connecting Arches
Identify the first sc of each nine-stitch green leaf.
Join pink in one of those stitches. Ch 1 and work 1 sc into the same stitch.
Ch 6. Skip the remaining eight stitches of that leaf and its separating slip stitch.
Work 1 sc into the first sc of the next leaf.
Continue around. After the eighth ch-6 arch, join to the first pink sc.
Count: eight sc anchors and eight ch-6 arches.
Round 8 — Pink Shells
Sl st into the first ch-6 arch.
Ch 2 and work 6 dc into that arch.
Work 1 sc into the next anchor stitch from Round 7.
Repeat around, working six dc into each arch and one sc into each following anchor.
Join with a sl st to the first dc.
Count: eight shells, containing 48 dc, plus eight sc anchors.
Fasten off pink.
Round 9 — Open Arches Across the Shells
Identify the third dc of each six-dc shell.
Rejoin pink in one of those stitches. Ch 1 and work 1 sc into the same stitch.
Ch 7, then work 1 sc into the third dc of the next shell.
Continue around, skipping all stitches between the specified attachment points.
After the eighth ch-7 arch, join to the first sc.
Count: eight sc anchors and eight ch-7 arches.
Round 10 — Divided Shells
Sl st into the first ch-7 arch.
Ch 2, then work 3 dc, ch 2, 3 dc into that arch.
Work the same group into each remaining ch-7 arch. Skip the sc anchors between arches.
Join to the first dc.
Count: 48 dc and eight ch-2 spaces.
Round 11 — Supports for the Outer Petals
Sl st across to the first ch-2 space.
Ch 1 and work 1 sc into that space.
Ch 7, then work 1 sc into the next ch-2 space.
Continue around. After the eighth arch, join to the first sc.
Count: eight sc anchors and eight ch-7 arches.
Pause here: spread the piece on a level surface without stretching it. Look for a missed arch, an extra shell, or a chain drawn tightly across a wider section. Correct those issues before adding the final border.
The Outer Petals and Picots: Rounds 12–14
Round 12 — Eight Outer Petals
Sl st into the first ch-7 arch.
Ch 1 and work the following into the arch:
1 sc, 1 hdc, 5 dc, 1 hdc, 1 sc.
Sl st into the next sc anchor.
Repeat around, working one nine-stitch petal into each arch and one separating sl st into the following anchor.
After the final separator, join to the first sc.
Count: eight petals, containing 72 petal stitches, plus eight separating slip stitches.
Round 13 — Widen the Petal Outlines
Ch 1.
Work across the nine stitches of the first petal as follows:
- Sc in stitch 1.
- Hdc in stitch 2.
- Dc in stitch 3.
- Work 2 dc in stitch 4.
- Dc in stitch 5.
- Work 2 dc in stitch 6.
- Dc in stitch 7.
- Hdc in stitch 8.
- Sc in stitch 9.
Ch 2 and skip the separating slip stitch.
Repeat across the remaining petals.
After the final ch 2, join to the first sc.
Count: 11 stitches per petal, totaling 88 stitches, plus eight ch-2 spaces.
The fourth and sixth stitches of each underlying petal receive the increases.
Round 14 — One Picot per Petal
Ch 1.
Work 1 sc into each of the first six stitches of the first petal.
Make a picot: ch 3, sl st into the first chain.
Work 1 sc into each of the remaining five stitches of that petal.
Work 2 sc into the next ch-2 space.
Repeat around.
Join with a sl st to the first sc and fasten off.
Count: 104 sc and eight picots.
Each picot sits after the sixth stitch of an 11-stitch petal, placing it at the middle of the outline.
Visual Guide: Outer Petal Increases and Picot Placement
Compare positions 4 and 6 before widening each petal; the final picot follows the sixth single crochet.
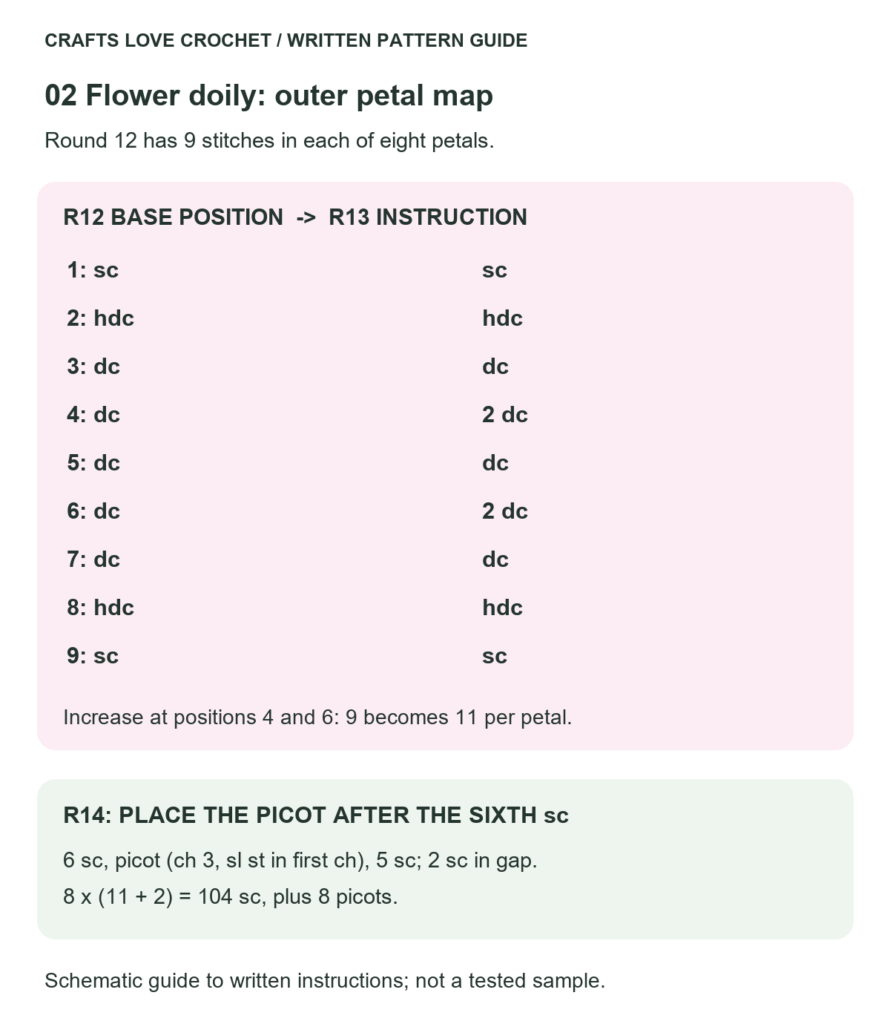
Open this guide at a larger size.
Reading the Shape Before Blocking
A layered doily does not behave like a plain circle. The inner petals can lift while the supporting arches and outer lace spread beneath them. That difference is intentional; a whole section folding into a bowl or forming strong waves needs closer inspection.
Use the location of the distortion to narrow down the cause:
| What you notice | What to check |
|---|---|
| One section looks narrower | Compare its chain count and attachment points with the neighboring sections. |
| The green layer pulls across the pink flower | Check that Round 5 was worked behind the petals. |
| One outer petal looks wider | Confirm the increases in stitches 4 and 6 of Round 13. |
| Picots sit off-center | Confirm that each Round 13 petal has 11 stitches and that the picot follows the sixth sc. |
| The whole border pulls inward or waves | Check the counts, then assess whether the construction suits your yarn and tension. |
Blocking is a finishing step, not a substitute for correcting a misplaced stitch or an unsuitable increase distribution.
Finishing Without Flattening the Flower
Weave in the ends through their matching color sections. Avoid tightening the tails around the bases of the raised petals.
If wet blocking is appropriate for the yarn, follow its care instructions and arrange the piece on a suitable surface.
Begin with the center. Position opposite outer petals in pairs, then arrange the remaining petals between them. This makes uneven spacing easier to see.
Keep the inner pink flower slightly raised rather than pressing every layer into the same plane. Open the lace gently and position the picots without pulling the edge tightly.
Allow the piece to dry completely before moving it.
For display, consider a shallow tray, a shelf, or a flat arrangement where the layered center remains visible. If placing an object on top, check that its base rests securely without rocking on the raised petals.
Three Questions Before Choosing a Variation
Can I use a finer yarn?
Yes, but make a complete sample with an appropriate hook. A finer yarn changes the scale and may also change how the arches and layered sections behave.
Can I make everything in one color?
Yes. The stitch structure will provide the contrast instead of the color changes. Keep track of the round transitions even when you do not need to change yarn.
Can I enlarge the crochet flower doily pattern by adding rounds?
Additional rounds require a new plan for spacing and increases. Repeating an existing round does not automatically preserve a flat shape.
If you want another layered decorative project, the Crochet Star Snowflake Wreath Ornament also uses a rear support layer beneath visible petals.
Keep a Record of the Finished Piece
Write down the yarn, hook, diameter, and any construction changes while they are still fresh.
Photograph the doily from directly above and from a low side angle. The overhead view shows the spacing; the side view reveals how the pink flower, green leaves, and outer lace sit together.
Those details are particularly useful when comparing color combinations or making another piece from this crochet flower doily pattern.