This one-eyed alien amigurumi crochet pattern combines an elongated green body, a colorful layered eye, and two soft antennae. The face is assembled from separate crochet circles, giving you a chance to adjust the expression before sewing the eye onto the body.
The main piece is worked from the bottom upward. Arms, legs, antennae, and facial details are made separately, then positioned around the completed body.
This version uses unreinforced crochet antennae. They can bend and drape, but they will not hold a fixed upright pose. Their angle and the curved eyebrow give the character much of its expression.

Project illustration for inspiration, not a verified sample of this recipe. Follow the written instructions and schematic guides for the construction, stitch counts, and details included in this version.
Project illustration: Original One-Eyed Alien Amigurumi Crochet Pattern
Materials for the One-Eyed Alien Amigurumi Crochet Pattern
- Worsted-weight cotton yarn in light green.
- Yellow, orange, red, and white yarn of a similar weight for the eye.
- Black yarn for the eyebrow.
- Black embroidery thread for the mouth.
- A 3.0 mm crochet hook as a starting point.
- Polyester fiberfill.
- A tapestry needle.
- An embroidery needle suitable for the thread.
- Stitch markers.
- Scissors.
- Removable markers or pins for positioning the pieces.
Choose a hook that produces close stitches without making the fabric difficult to work.
Finished measurements and yarn quantities depend on the materials, tension, and filling. Record the dimensions of your completed sample rather than relying on a fixed height.
Abbreviations and Techniques
This pattern uses US crochet terminology.
- MR: magic ring.
- ch: chain.
- sl st: slip stitch.
- sc: single crochet.
- inc: work 2 sc into the same stitch.
- dec: invisible single crochet decrease.
- st / sts: stitch / stitches.
- FO: fasten off.
For standard abbreviations and differences between US and UK terms, consult the Craft Yarn Council’s crochet abbreviation guide.
Invisible Decrease
Insert the hook through the front loop of the next stitch, then through the front loop of the following stitch.
Yarn over and pull through both front loops. Yarn over again and pull through the remaining two loops.
One decrease uses two stitches and produces one stitch.
Reading the Instructions
“Work 3 sc” means one sc into each of the next three stitches.
“Repeat 3 sc, inc six times” means repeat that entire four-stitch sequence six times around.
Work through both loops unless another placement is specified.
One-Eyed Alien Amigurumi Crochet Pattern: Construction Notes
Work the body, limbs, antennae, and eye circles in continuous spirals. Do not join or turn between rounds.
Use a marker to identify the first stitch of each round.
The body begins at the bottom. The final decrease rounds close the top of the character.
Add filling gradually rather than waiting until the final opening. Keep the upper sewing edges of the arms and legs free of filling so they can flatten.
Leave long tails on separate pieces for assembly.
Part 1: Crochet the Body
With light green, begin at the bottom of the body.
Increase Rounds
| Round | Instructions | Final count |
|---|---|---|
| 1 | Work 6 sc into an MR. | 6 |
| 2 | Inc in every stitch. | 12 |
| 3 | Repeat 1 sc, inc six times. | 18 |
| 4 | Repeat 2 sc, inc six times. | 24 |
| 5 | Repeat 3 sc, inc six times. | 30 |
| 6 | Repeat 4 sc, inc six times. | 36 |
| 7 | Repeat 5 sc, inc six times. | 42 |
| 8 | Repeat 6 sc, inc six times. | 48 |
| 9 | Repeat 7 sc, inc six times. | 54 |
| 10 | Repeat 8 sc, inc six times. | 60 |
| 11 | Repeat 9 sc, inc six times. | 66 |
Tighten and secure the magic-ring tail while the inside remains accessible.
Rounds 12–44
Work 1 sc into every stitch around.
Count: 66 sc in each of these 33 rounds.
Use a row counter or written checklist to track this section.
Begin adding fiberfill as the body grows. Distribute small amounts around the interior, avoiding hard lumps and empty pockets.
Decrease Rounds
| Round | Instructions | Final count |
|---|---|---|
| 45 | Repeat 9 sc, dec six times. | 60 |
| 46 | Work 1 sc into every stitch. | 60 |
| 47 | Repeat 8 sc, dec six times. | 54 |
| 48 | Repeat 7 sc, dec six times. | 48 |
| 49 | Repeat 6 sc, dec six times. | 42 |
| 50 | Repeat 5 sc, dec six times. | 36 |
| 51 | Repeat 4 sc, dec six times. | 30 |
| 52 | Repeat 3 sc, dec six times. | 24 |
| 53 | Repeat 2 sc, dec six times. | 18 |
| 54 | Repeat 1 sc, dec six times. | 12 |
| 55 | Work six decreases. | 6 |
Check and adjust the filling as the opening narrows. Complete the stuffing before working Round 55.
The surface should feel evenly filled without stretching open the spaces between stitches.
Fasten off, leaving a closing tail.
Thread the tail through the front loops of the final six stitches. Draw the opening closed, secure the yarn, and bury the tail.
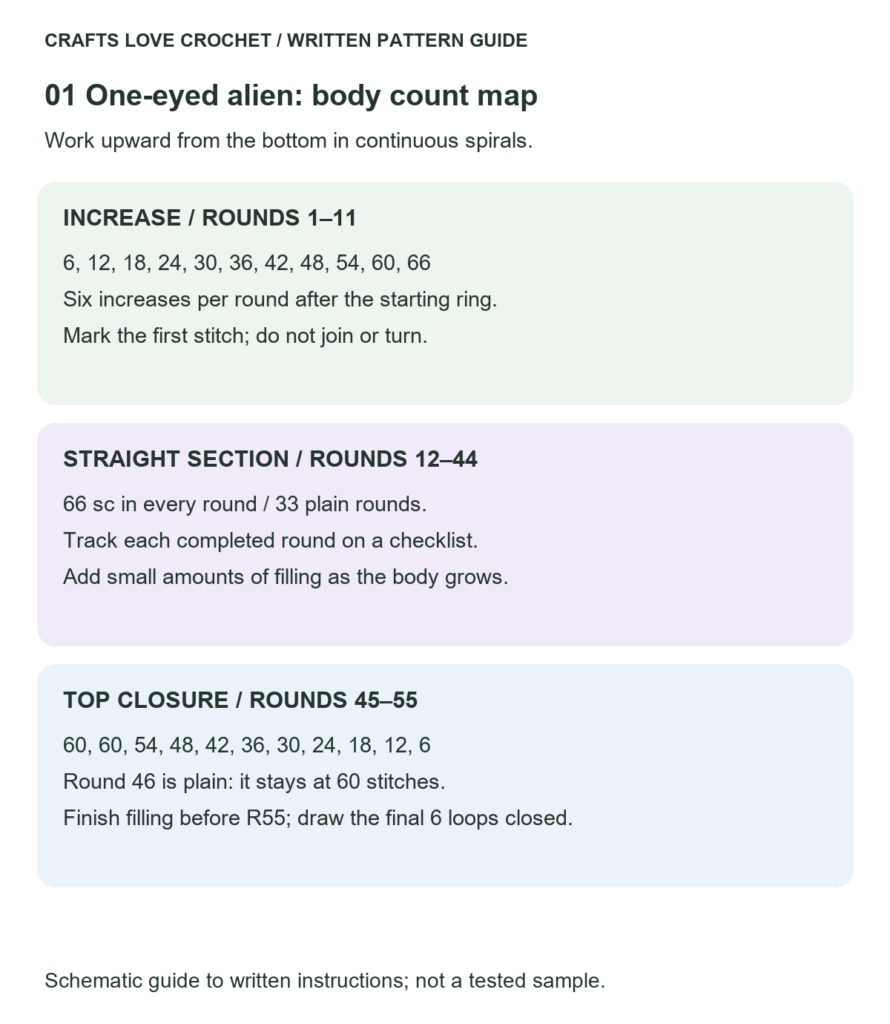
Visual Guide: Body Round Counts
Use this map to track the long straight section and the top decreases. Round 46 remains at 60 stitches.
Open this guide at a larger size.
Part 2: Legs — Make Two
With light green:
Round 1
Work 6 sc into an MR.
Count: 6 sc.
Round 2
Inc in every stitch.
Count: 12 sc.
Rounds 3–12
Work 1 sc into every stitch.
Count: 12 sc in each of these ten rounds.
Add a small amount of filling to the lower part. Leave the upper edge unstuffed.
Close the Leg
Flatten the opening so six stitches lie along the front and six along the back.
Work 6 sc across the opening, passing through one front stitch and the corresponding back stitch for each sc.
This is a closing row, not another circular round.
Fasten off, leaving a long sewing tail.
Make the second leg in the same way.
Part 3: Arms — Make Two
With light green:
Round 1
Work 6 sc into an MR.
Count: 6 sc.
Round 2
Work 1 sc into every stitch.
Count: 6 sc.
Round 3
Repeat 1 sc, inc three times.
Count: 9 sc.
Rounds 4–18
Work 1 sc into every stitch.
Count: 9 sc in each of these fifteen rounds.
Lightly fill only the lower half. Keep the upper arm flexible.
Round 19
Work 1 sc into each of the next seven stitches, then work one dec over the final two stitches.
Count: 8 sc.
Close the Arm
Flatten the opening into four front stitches and four back stitches.
Work 4 sc across, passing through a corresponding pair of stitches each time.
Fasten off, leaving a long sewing tail.
Repeat for the second arm.
Part 4: Soft Antennae — Make Two
With light green:
Round 1
Work 5 sc into an MR.
Tighten the ring.
Count: 5 sc.
Rounds 2–40
Work 1 sc into every stitch.
Count: 5 sc in each round.
Leave the narrow tube unstuffed.
Fasten off, leaving a long sewing tail. Keep the final five-stitch opening available for attaching the antenna to the body.
The magic-ring end is the free tip; the open end is the base.
Make the second antenna with the same round count.
These long tubes are intended to drape. If you prefer shorter antennae, stop both pieces after the same smaller number of rounds and compare them before sewing.
Part 5: Make the Layered Eye
The eye has four separate circles:
- Yellow outer circle.
- Orange middle circle.
- Red inner circle.
- White center detail.
Use similar yarn thicknesses so the differences in circle size remain visible.
Yellow Outer Circle
| Round | Instructions | Final count |
|---|---|---|
| 1 | Work 6 sc into an MR. | 6 |
| 2 | Inc in every stitch. | 12 |
| 3 | Repeat 1 sc, inc six times. | 18 |
| 4 | Repeat 2 sc, inc six times. | 24 |
| 5 | Repeat 3 sc, inc six times. | 30 |
| 6 | Repeat 4 sc, inc six times. | 36 |
Sl st into the next stitch to finish. This finishing slip stitch is not included in the count.
Fasten off with a long sewing tail.
Orange Middle Circle
| Round | Instructions | Final count |
|---|---|---|
| 1 | Work 6 sc into an MR. | 6 |
| 2 | Inc in every stitch. | 12 |
| 3 | Repeat 1 sc, inc six times. | 18 |
| 4 | Repeat 2 sc, inc six times. | 24 |
| 5 | Repeat 3 sc, inc six times. | 30 |
Sl st into the next stitch and fasten off with a sewing tail.
Red Inner Circle
| Round | Instructions | Final count |
|---|---|---|
| 1 | Work 6 sc into an MR. | 6 |
| 2 | Inc in every stitch. | 12 |
| 3 | Repeat 1 sc, inc six times. | 18 |
Sl st into the next stitch and fasten off with a sewing tail.
White Center Detail
Round 1: Work 6 sc into an MR.
Count: 6 sc.
Round 2: Inc in every stitch.
Count: 12 sc.
Sl st into the next stitch and fasten off with a sewing tail.
Assemble the Eye Before Attaching It
Lay the white circle on the red circle and center it.
Sew around the white edge using small stitches. Keep the red fabric relaxed rather than pulling it toward the smaller circle.
Center the red-and-white piece on the orange circle and sew around the red edge.
Finally, center the assembled layers on the yellow circle and sew around the orange edge.
Leave the yellow outer edge free for attaching the completed eye to the body.
Secure the individual magic-ring tails and sewing ends on the reverse as you work. Do not add stuffing between the layers.
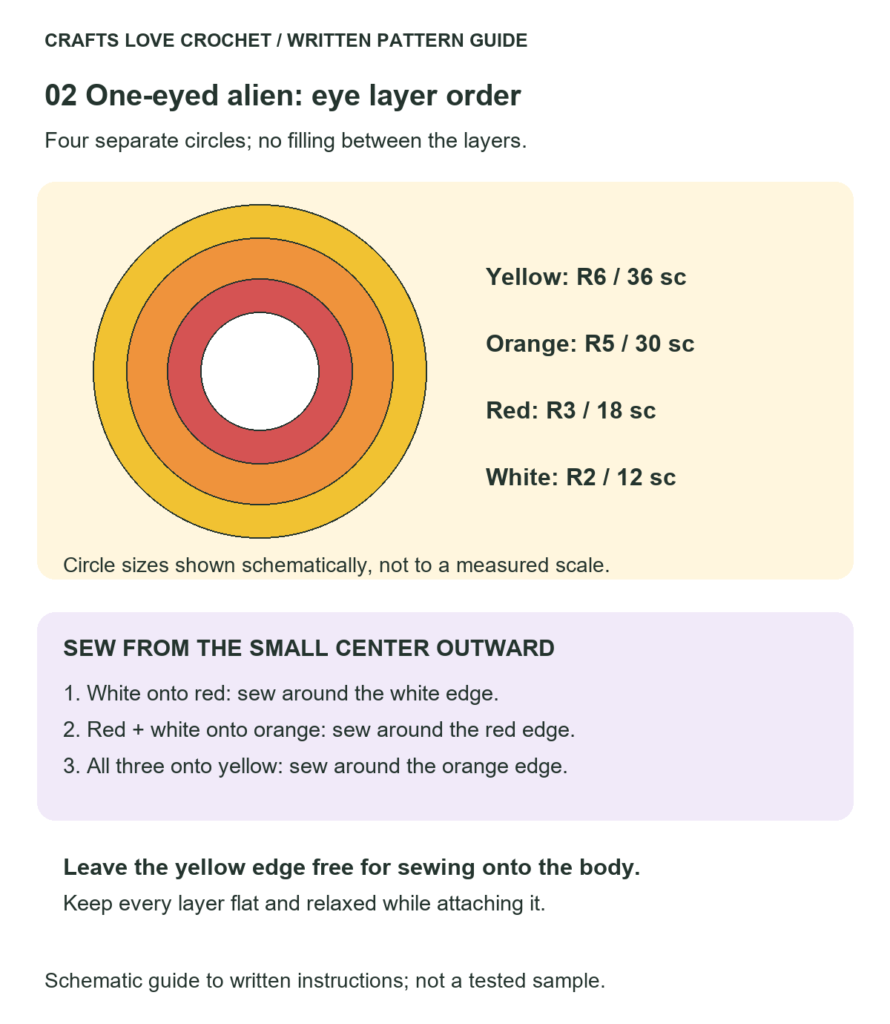
Visual Guide: Layered Eye Sewing Order
Assemble the four circles from the smallest outward, leaving the yellow edge free for the body seam.
Open this guide at a larger size.
Part 6: Eyebrow
With black yarn, ch 18.
Starting in the second chain from the hook, work 1 sc into each chain.
Count: 17 sc.
Fasten off, leaving a long sewing tail.
The strip will be positioned in a curve above the eye during assembly.
Assembling the One-Eyed Alien Amigurumi Crochet Pattern
Establish the Front
Choose the side of the body you want to use as the face.
Place a temporary marker along its vertical center. Use this reference when positioning the eye, mouth, arms, and legs.
Attach the Eye
Position the completed eye on the upper front of the body. As a starting reference, place its center near Body Round 36.
Check that there is room for the eyebrow above and the mouth below. Adjust the position to suit the actual size of your eye assembly.
Sew around the yellow outer edge with small, evenly spaced stitches.
Follow the curve of the stuffed body without pulling the eye into a cup or flattening the body beneath it.
Attach the Eyebrow and Embroider the Mouth
Pin the black strip in a gentle curve above the eye. Leave a visible gap between the eyebrow and the yellow edge.
Sew the strip into place, checking the expression as you work.
Using black embroidery thread, mark a smile below the eye across approximately 16 stitch columns.
Embroider the curve with several short stitches rather than one long loose strand. Add a small upward stitch at one end if you want an asymmetric grin.
Keep the thread relaxed enough that the fabric does not pucker.
Attach the Arms
Position the closed arm edges on opposite sides of the body near Round 32.
Check that both arms sit at the same height and hang in the direction you want.
Sew each four-stitch closing edge securely to the body. Leave the rest of each arm free.
Attach the Legs
Position the closed leg edges beneath the lower front of the body, near the starting rounds.
Compare the spacing from the front and underneath before sewing.
Attach each six-stitch closing edge with several small stitches through the body fabric.
The legs provide part of the pose, but their placement does not guarantee that the finished character will stand or sit unsupported.
Attach the Antennae
Position the two open antenna bases symmetrically on the upper curve of the body, one on each side of the top closure.
Sew around each five-stitch opening, attaching it to the body surface.
Check the natural drape before securing the final tails. Add a few small holding stitches along the base if needed to set the direction in which the antenna falls.
Practical Tips
Track the Long Body Section
Rounds 12–44 contain 33 rounds with no increases or decreases. Marking each completed round helps prevent changes to the body length.
Compare Paired Pieces
Lay the arms, legs, and antennae beside their matching partners before assembly. Check both round counts and filling.
Keep the Eye Layers Relaxed
Tight sewing can make the colored circles gather. Attach each layer while it rests naturally on the larger circle beneath it.
Finish Stuffing Before Closing the Body
Once the final six stitches are drawn shut, there is no opening left for adjusting the filling. Check the shape from several angles before closure.
Choose the Expression Before Sewing Permanently
Pin the eye and eyebrow together first. Small changes in eyebrow angle or eye height can noticeably alter the character.
Finishing and Care
Remove all positioning pins and markers.
Check the seams around the eye, limbs, and antenna bases. Secure loose ends and bury tails without pulling dents into the body.
Follow the care instructions for the yarn and stuffing. If cleaning the finished piece, allow the interior to dry completely before storing it.
For display, use a stable supporting surface if the character does not balance independently.
Frequently Asked Questions
Is This One-Eyed Alien Amigurumi Crochet Pattern Suitable for Beginners?
It is best suited to crocheters who already know continuous rounds, increases, decreases, and basic amigurumi sewing. The layered eye and narrow antenna tubes require additional patience.
Does the Body Include a Separate Head?
No. The body and face share one elongated main piece. The eye, eyebrow, and mouth establish the face on its upper section.
Why Is There an Extra Decrease Round on the Arms?
The arm tube has nine stitches. Reducing it to eight allows the opening to be flattened into four matching pairs for a clear, even closing row.
Will the Antennae Stay Upright?
No fixed upright shape is built into this version. The antennae are soft crochet tubes without an internal support.
Can I Change the Eye Colors?
Yes. Keep the circle sizes and layer order consistent if you want the same arrangement. Yarn thickness should remain similar across the four pieces.
More Space-Themed Crochet Projects
For another character with a different construction, explore our Crochet Little Alien Amigurumi Pattern, which combines a rounded head, smaller body, and white side tufts.
You can also browse our Amigurumi Patterns collection for other crocheted characters and assembly ideas.
Share Your Alien’s Expression
If you try this one-eyed alien amigurumi crochet pattern, share your yarn, hook size, finished measurements, and any changes to the antenna length or face placement.
A front and side photograph can help show how those choices affect the finished character.