There’s something magical about decorating for the holidays with handmade pieces, especially when every stitch carries a little bit of your own creativity. I’ve made this Crochet Star Snowflake Wreath Ornament Pattern several times over the years, and it always becomes one of the ornaments people notice first on the tree. The layered petals, delicate embroidered details, and tiny stars create a beautiful snowflake effect that feels elegant without being difficult to make.
One thing I discovered while testing this design is that keeping an even tension throughout the petals makes a remarkable difference in the finished wreath. After lightly blocking the ornament, the petals open beautifully and the entire piece looks crisp and symmetrical. It also works wonderfully as a thoughtful handmade gift, a holiday keepsake, or even as a decorative embellishment for wreaths and wrapped presents.
Whether you’re decorating your own home or creating a collection of handmade Christmas ornaments, this project is both relaxing and incredibly rewarding.
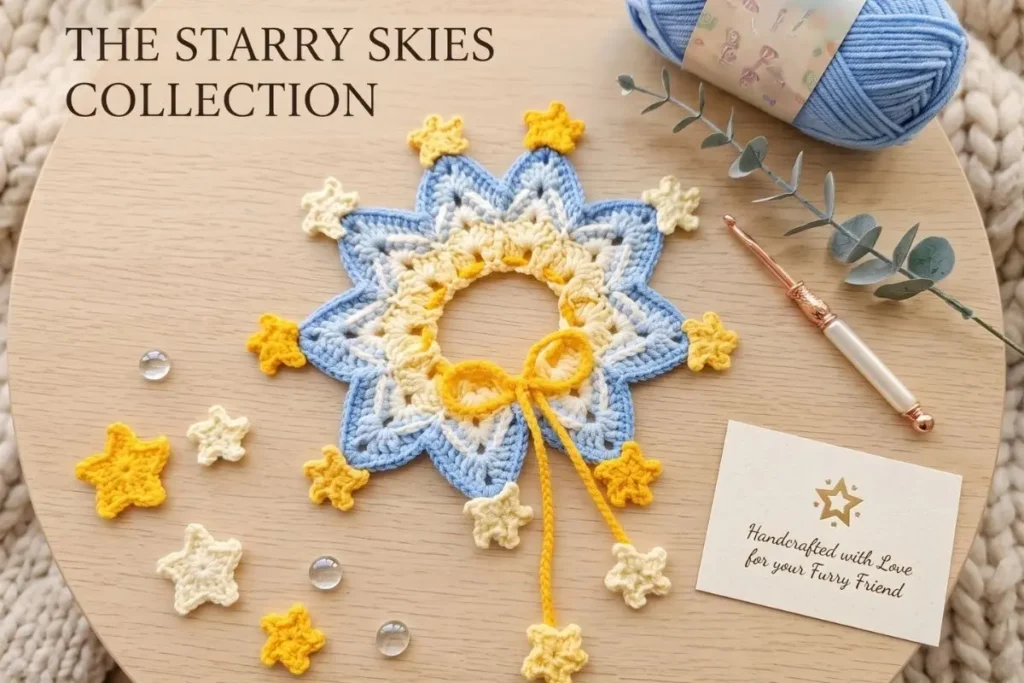
Finished Size
Approximately 5.5–6 inches (14–15 cm) across using the recommended materials.
What You’ll Need
Materials
- Sport Weight Cotton Yarn
- Cream
- Baby Blue
- Golden Yellow
- 2.5 mm crochet hook
- Yarn needle
- Scissors
- Stitch markers (optional)
Abbreviations (US Terms)
- ch – chain
- sl st – slip stitch
- st – stitch
- sc – single crochet
- hdc – half double crochet
- dc – double crochet
- tr – treble crochet
- picot – ch 3, sl st in first ch
- MR – magic ring
- FO – fasten off
- rep – repeat
- sp – space
- BLO – back loop only
- FLO – front loop only
Pattern Notes
Before you begin, take a moment to read through the entire pattern from start to finish. Understanding how each section connects will make the project flow much more smoothly.
- Read the entire pattern before beginning.
- Chains at the beginning of rounds do not count as stitches unless stated.
- Work with even tension to keep the wreath flat.
- Blocking is highly recommended after finishing.
Step-by-Step Pattern
PART 1 – Center Ring (Cream)
Round 1
Create a Magic Ring.
Ch 1.
Work 24 sc into the ring.
Join with a sl st to the first sc.
(24 sts)
Round 2
Ch 2.
Work 1 dc in each stitch around.
Join.
(24 dc)
Round 3
Ch 1.
(Sc in next st, ch 2)
Repeat around.
Join.
(24 sc, 24 ch-2 spaces)
This decorative round creates small eyelets similar to the original sample.
FO Cream.
PART 2 – White Petal Base
Join white yarn in any ch-2 space.
Round 4
In each chain space work:
(sc, hdc, 3 dc, hdc, sc)
Skip next sc.
Repeat around.
You should have:
12 small petals.
Join.
Do not fasten off.
Round 5
Working behind the petals:
Ch 4.
Sl st behind the next petal.
Repeat around.
You’ll create 12 arches.
PART 3 – Blue Outer Petals
Join blue yarn in first arch.
Each large petal is worked into one arch.
Petal
Into one arch work:
sc
hdc
dc
2 tr
dc
hdc
sc
Continue around all arches.
(12 petals)
Join.
Round 6 – Petal Outline
Continue with blue.
Work evenly around each petal:
sc
hdc
dc
dc
tr
tr
dc
dc
hdc
sc
Work one sl st between petals.
Repeat around.
Join.
FO.
PART 4 – White Decorative Lines
Using white yarn and a yarn needle:
Embroider one straight stitch from the center toward the tip of every blue petal.
Add two diagonal stitches beside it to create a snowflake vein effect.
Repeat on all petals.
PART 5 – Mini Stars (Make 10)
Using yellow or cream.
Round 1
MR.
Work:
(sc, ch 2, sl st in second ch)
Repeat 5 times.
Pull ring closed.
Join.
Tiny five-pointed star completed.
Leave a long tail for sewing.
Make:
- 5 yellow stars
- 5 cream stars
PART 6 – Attach Stars
Sew one star onto every outer valley between petals.
Alternate colors around the wreath.
PART 7 – Hanging Bow
Using yellow yarn.
Cord
Chain approximately 60.
FO.
Thread through the openings in the cream center round.
Tie into a neat bow.
Leave two hanging tails.
Tassel Star Decorations
Make two additional chains:
Chain 18
FO
Attach one miniature star to the end of each chain.
Sew beneath the bow.
Finishing
Weave in all ends securely.
Wet block lightly.
Shape every petal with your fingers.
Allow to dry completely before hanging.
My Experience & Practical Tips
After making this ornament more than once, I found that a few small details can completely transform the finished look.
Using cotton yarn is well worth it because it holds the sharp points of the petals beautifully. Softer yarns tend to relax over time, making the snowflake effect less defined.
If your wreath starts to ripple while working the petals, it’s usually caused by uneven tension rather than the pattern itself. Slowing down and keeping each stitch consistent will help everything lie flat before blocking.
When embroidering the decorative white lines, try not to pull the yarn too tightly. Gentle stitches sit nicely on top of the petals without causing them to curl inward.
Don’t skip blocking. Even if the ornament already looks nice, a quick wet block makes every petal open evenly and gives the wreath a polished, professional appearance.
When sewing on the tiny stars, secure them with several small stitches instead of one large stitch through the center. They stay in place much better, especially if the ornament will be packed away and used year after year.
Designer Tips
- Cotton yarn produces crisp, well-defined petals.
- Blocking makes a dramatic difference in the final appearance.
- For a festive version, substitute the blue yarn with silver or icy lavender.
- Tiny pearl beads can be sewn into the center for an elegant finish.
- A light spray of fabric stiffener will help the ornament maintain its shape year after year.
Color Placement Guide
| Section | Color |
|---|---|
| Center Ring | Cream |
| Inner Petals | White |
| Outer Petals | Baby Blue |
| Stars | Alternate Yellow and Cream |
| Bow | Golden Yellow |
Approximate Measurements
| Part | Size |
|---|---|
| Center opening | 2 in (5 cm) |
| Overall diameter | 5.5–6 in (14–15 cm) |
| Large petals | 12 |
| Mini stars | 10 |
Tips & Variations
This Crochet Star Snowflake Wreath Ornament Pattern is lovely exactly as written, but it’s also easy to personalize with your favorite holiday colors. Try soft silver, icy lavender, rich emerald, or classic Christmas red for a completely different seasonal style while preserving the same elegant texture.
The finished ornament also looks beautiful hanging from gift bags, decorating a holiday garland, embellishing a larger wreath, or displayed in a festive window.
Frequently Asked Questions
Is this Crochet Star Snowflake Wreath Ornament Pattern suitable for beginners?
Confident beginners who are comfortable working in the round and reading standard US crochet abbreviations should be able to complete this project successfully.
What yarn works best?
Sport weight cotton yarn gives the ornament its crisp definition and helps it keep its shape after blocking.
Do I really need to block the ornament?
Yes. Blocking helps the petals open evenly and gives the finished wreath the polished snowflake appearance shown in the sample.
Can I use different colors?
Absolutely. Traditional winter shades, metallic colors, or classic Christmas palettes all work beautifully.
Can I add embellishments?
Yes. Small pearl beads, tiny bells, or subtle metallic thread can give the ornament an elegant festive finish.
If you enjoy fun and creative amigurumi projects, the Crochet Little Alien Amigurumi Pattern is a fantastic companion to this ornament, featuring an adorable character that’s perfect for gifts or collecting. Looking for a quick project between larger makes? The Crochet Frilly Heart Appliqué Pattern works up fast and adds a charming handmade touch to blankets, bags, and greeting cards. And if whimsical designs are your favorite, don’t miss the Original One-Eyed Alien Amigurumi—its playful personality and unique details make it a delightful project for crocheters who love creating memorable handmade gifts.
Conclusion
I truly enjoyed making this Crochet Star Snowflake Wreath Ornament Pattern, and it has become one of those projects I look forward to bringing out every holiday season. After testing the design, I found that careful blocking and even tension make every layer stand out beautifully, giving the finished ornament a timeless look that lasts year after year.
Whether you’re creating ornaments for your own Christmas tree, preparing thoughtful handmade gifts, decorating holiday wreaths, or stocking your next craft fair booth, this design is both enjoyable to crochet and beautiful to display. It’s the kind of project that brings a handmade touch to every celebration.
❤️ Loved this pattern?
Share this Crochet Star Snowflake Wreath Ornament Pattern with your crochet friends, save it for your holiday crochet collection, and enjoy creating decorations that can become treasured family keepsakes for years to come.