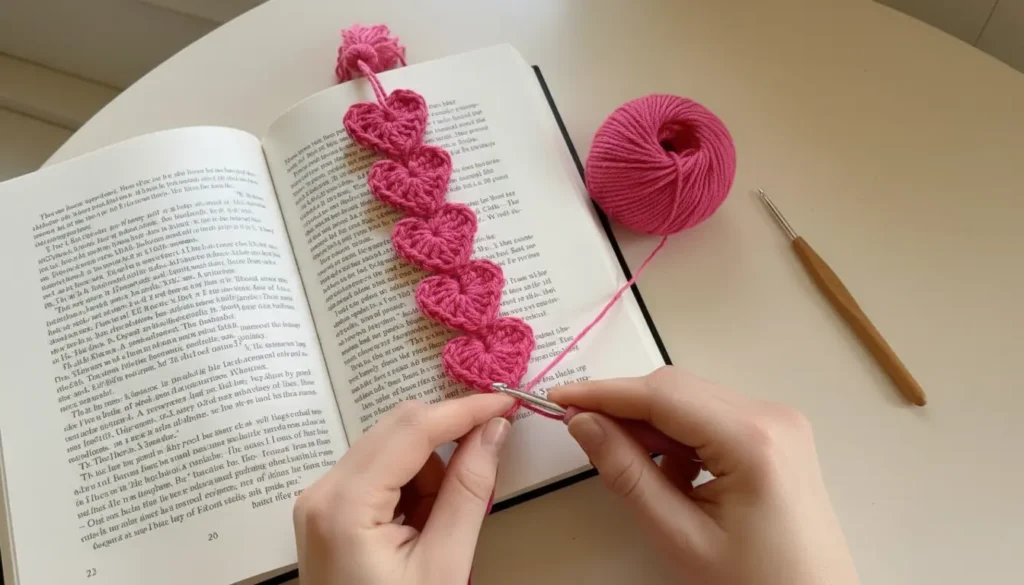
I’ve made this Crochet Heart Garland Pattern more times than I can count—especially around Valentine’s season and for nursery decor—and it never disappoints. There’s something about those soft, puff-stitch hearts lined up together that feels both cozy and a little bit special.
What I love most is how flexible this project is. You can make it as long or short as you like, and it works beautifully as wall decor, a party banner, or even wrapped around a gift. When I first tested it, I played around with different yarns and found that cotton really makes those stitches pop, while acrylic gives a softer, fluffier look.
It’s also surprisingly quick. Once you get into the rhythm, you can finish a full garland in an evening.
🧵 What You’ll Need
- Worsted weight yarn (Category 4) – cotton or acrylic
- Hook: 4.0 mm (G/6)
- Yarn needle
- Scissors
📏 Finished Size
- Each heart: approx. 4–5 cm (1.5–2 in)
- Total length: adjustable (sample has 6 hearts + tassel)
🧶 Abbreviations (US Terms)
- ch = chain
- sl st = slip stitch
- sc = single crochet
- dc = double crochet
- tr = treble crochet
- st(s) = stitch(es)
- sp = space
- yo = yarn over
✨ Special Stitch
Puff Stitch (Puff):
Yo, insert hook into st, yo, pull up a loop × 4–5 times, yo, pull through all loops, ch 1 to secure.
❤️ Step-by-Step Instructions
Heart Motif (Make as you go)
Each heart is worked into a magic ring (or ch 4, sl st to form a ring).
💗 Pattern
Round 1 (Heart)
Into MR:
- ch 2 (does not count as st)
- 3 tr
- 3 dc
- ch 1
- 1 tr (point of heart)
- ch 1
- 3 dc
- 3 tr
- ch 2
- sl st into MR
Tighten the ring firmly.
👉 You now have one complete heart.
🔗 Joining Hearts (Continuous Garland)
Do not fasten off.
- After finishing a heart, ch 2–4 (depending on desired spacing; sample uses ch 2 for tight join).
- Start next heart:
- Make a new MR
- Work the same heart sequence inside the ring
- Before closing the heart:
- Join to previous heart by inserting hook into the bottom point stitch of the previous heart and sl st
- Complete the heart as normal
Repeat until you have your desired number of hearts (sample = 6).
🎀 Top Loop + Tassel
Hanging Loop
- After last heart, ch 12–18 (adjust length)
- Sl st into top of last heart to form a loop
- Fasten off
Tassel
- Cut 12–20 strands of yarn (~15 cm each)
- Fold in half
- Attach to the top loop using a lark’s head knot
- Wrap a small strand around the top to secure (optional)
- Trim evenly
🧶 Finishing Touches
- Weave in all ends neatly
- Lightly block if needed to shape the hearts
📝 Pattern Notes
This Crochet Heart Garland Pattern is worked continuously, which means you don’t need to sew individual hearts together later—a small detail that makes a big difference. The spacing chains between hearts can be adjusted depending on the look you prefer: tighter for a compact garland, or longer for a more delicate drape.
💡 My Experience & Practical Tips
After making several versions of this garland, here are a few things that truly make a difference:
- Don’t rush the magic ring tightening
This is where most beginners struggle. If the center isn’t pulled tight enough, the heart loses its shape. I always give it an extra firm pull before moving on. - Watch your puff stitch tension
Too tight, and the heart looks stiff. Too loose, and it loses definition. Aim for a soft, slightly airy puff—it makes the whole piece look more delicate. - Consistent spacing matters more than you think
If your chain spacing changes from heart to heart, it becomes noticeable quickly. I like to count out loud for the first few repeats to stay consistent. - Use cotton for structure, acrylic for softness
Cotton gives that crisp stitch definition (great for photos or decor), while acrylic feels cozier and slightly fuller. - Joining tip that saves frustration
When connecting hearts, make sure you’re inserting your hook into the exact bottom point stitch. Missing it even slightly can twist the alignment.
🌸 Tips & Variations
- Use pastel colors for nursery decor
- Try red, pink, and white for Valentine’s Day
- Make mini versions for gift wrapping
- Add beads or small charms between hearts
If you enjoy working with floral or decorative motifs, you might also love creating something like a Crochet Flower Motif Pattern—they pair beautifully with heart garlands for seasonal decor.
❓ FAQ (Schema Style)
Q: Is this Crochet Heart Garland Pattern beginner-friendly?
A: Yes! If you’re comfortable with basic stitches and working in a magic ring, you’ll do just fine.
Q: Can I make it longer or shorter?
A: Absolutely. Just repeat the heart section as many times as you like.
Q: What yarn works best?
A: Cotton for structure, acrylic for softness—both work beautifully depending on your preference.
Q: Do I need to block the hearts?
A: Not always, but light blocking helps even out the shape, especially if your tension varies.
💖 Conclusion
This Crochet Heart Garland Pattern is one of those projects I keep coming back to. It’s simple, reliable, and always turns out charming—whether I’m making it for my home, a handmade gift, or even to sell at small craft fairs.
It’s been tested, tweaked, and made in different yarns and colors, and it holds up every time. There’s a quiet satisfaction in seeing those little hearts lined up, knowing each one was made by hand.
If you enjoyed making this, don’t keep it to yourself—share it with your crochet friends or someone who would love a handmade touch in their space 💗