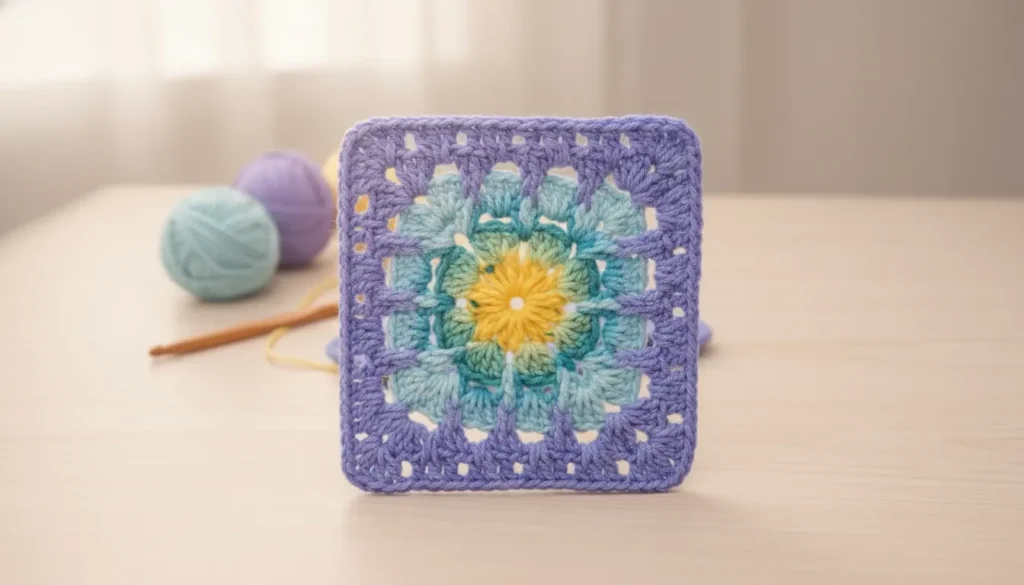
The Sunflower Granny Square Crochet Pattern is one of those projects that instantly brings warmth to your hands and your space. I’ve made this square more times than I can count—testing different yarns, playing with tension, and even turning a few into pillow covers and tote bags—and every version feels just as satisfying as the first.
What I love most about this pattern is how dimensional it looks in real life. The layered petals and textured center give it that almost lifelike sunflower appearance, especially when you take a bit of extra care shaping each piece. The first time I made it, I used a slightly tighter tension than usual, and the center came out beautifully firm—perfect for keeping the structure intact over time.
If you’re looking for something that feels a little more special than a basic granny square, but still approachable, this is a lovely piece to sit down with and truly enjoy.

What You’ll Need
- Worsted weight yarn (Category 4) in:
- Brown
- Golden yellow
- Orange
- Olive green
- Light yellow
- 4.0 mm or 4.5 mm crochet hook
- Yarn needle
- Scissors
- Stitch markers
- Blocking mat and pins (optional but recommended)
Pattern Notes
- This Sunflower Granny Square Crochet Pattern is a reconstructed interpretation based on the photo.
- Ch 1 at the beginning of a round does not count as a stitch unless stated.
- Join each round with a sl st to the first stitch unless stated otherwise.
- The flower is built in layers for the most accurate and realistic look.
Step-by-Step Instructions
CENTER DISK (Brown)
Rnd 1: With brown, make a MR. Ch 1, work 8 sc into the ring. Join. (8 sc)
Rnd 2: Ch 1, 2 sc in each st around. Join. (16 sc)
Rnd 3: Ch 1, sc in next st, 2 sc in next st around. Join. (24 sc)
Rnd 4: Ch 1, sc in each st around. Join. Fasten off brown. (24 sc)
Set aside.
INNER YELLOW POINTS (Make 12)
With light yellow:
Ch 4.
Starting in 2nd ch from hook, work:
- sc in next ch
- hdc in next ch
- sc in last ch
Fasten off, leaving a long tail for sewing.
Make 12 total.
ORANGE PETALS (Make 12)
With orange:
Ch 9.
Row 1: Starting in 2nd ch from hook, work:
- sc in next ch
- hdc in next ch
- dc in next 2 ch
- tr in next ch
- dc in next ch
- hdc in next ch
- sc in last ch
Ch 1, turn.
Now work the opposite side of the starting chain:
- sc in same last ch
- hdc in next st
- dc in next 2 sts
- tr in next st
- dc in next st
- hdc in next st
- sc in first ch
Fasten off, leaving a long tail for sewing.
Make 12 petals total.
Tip: Lightly block or shape each petal so it sits flat and slightly rounded.
GREEN LEAVES (Make 12)
With olive green:
Ch 7.
Row 1: Starting in 2nd ch from hook, work:
- sc in next ch
- hdc in next ch
- dc in next 2 ch
- hdc in next ch
- sc in last ch
Ch 1, turn.
Work the opposite side of the chain:
- sc in same last ch
- hdc in next st
- dc in next 2 sts
- hdc in next st
- sc in first ch
Fasten off, leaving a long tail for sewing.
Make 12 leaves total.
SQUARE BASE / BORDER (Golden Yellow)
Option A: Square base first, then sew the flower on top
With golden yellow:
Rnd 1: Ch 4, join to form a ring. Ch 2, work 12 hdc into the ring. Join. (12 hdc)
Rnd 2: Ch 2, 2 hdc in each st around. Join. (24 hdc)
Rnd 3: Ch 2, hdc in next 5 sts, then work [2 hdc, ch 2, 2 hdc] in next st for Corner 1.
Repeat this sequence 3 more times:
- hdc in next 5 sts
- [2 hdc, ch 2, 2 hdc] in next st
Join.
Rnd 4: Ch 2, hdc in each stitch across to the corner ch-2 space.
In each corner space, work [2 hdc, ch 2, 2 hdc].
Repeat around. Join.
Rnd 5–6: Repeat Rnd 4 until the square reaches the desired size and sides are even.
Fasten off.
Assembly
- Block all pieces lightly so they lie flat.
- Sew the brown center disk onto the middle of the square base.
- Sew the 12 inner yellow points evenly around the brown center.
- Sew the 12 orange petals around the yellow points, slightly overlapping the center.
- Sew the 12 green leaves behind the orange petals so only the tips show.
- Weave in all ends securely.
Shape Placement Guide
For the most realistic result:
- Place the brown circle in the center
- Add the yellow points directly around it
- Add the orange petals in a full ring
- Tuck the green leaves behind the petals
- Keep the outer square border in golden yellow
My Experience & Practical Tips
After making this Sunflower Granny Square Crochet Pattern several times, a few small details really made a difference in the final look:
- Petal shaping matters more than you think
The first time I skipped blocking, and the petals curled slightly inward. A quick steam or even finger-shaping while damp makes them sit beautifully. - Watch your tension on the center disk
If your stitches are too loose, the center won’t support the layers well. I usually go half a hook size down just for the brown center. - Don’t overstuff layers with yarn tails
When sewing, it’s tempting to leave everything inside—but too many tails can create bulk. Weave them outward into the square instead. - Pin before sewing
I learned this the hard way. Pinning all 12 petals evenly saves you from uneven spacing later. - Use a slightly firmer yarn for structure
Softer yarns look pretty but can make the square collapse over time, especially in blankets.
Finishing Touches
For a clean, polished result:
- Steam block the entire square lightly
- Pin the corners so they stay sharp
- Reinforce the center when sewing layers to prevent shifting
These small steps really elevate the final piece and make it look professionally finished.
FAQ (Schema Style)
Q: Is this Sunflower Granny Square Crochet Pattern beginner-friendly?
A: It’s best for confident beginners. The stitches are simple, but the assembly requires patience.
Q: Can I turn this into a blanket?
A: Absolutely. Just make multiple squares and join them together for a stunning sunflower blanket.
Q: What yarn works best?
A: Worsted weight cotton or acrylic works well. Cotton gives sharper definition, while acrylic is softer.
Q: Do I have to sew all the pieces?
A: Yes, for this version. Sewing is what creates the layered, realistic sunflower effect.
Internal Link Suggestions
If you enjoy this Sunflower Granny Square Crochet Pattern, you might also love exploring other floral granny squares or beginner-friendly motifs. They’re perfect for building confidence and creating cohesive blanket designs. A basic granny square guide can also help if you want to refine your edges and corners before starting larger projects.
This Sunflower Granny Square Crochet Pattern is one of those projects that truly feels worth the effort. I’ve tested it in different forms—single squares, cushion covers, and even bag panels—and it holds its shape beautifully when assembled with care.
It’s a lovely piece to gift, especially because it has that handmade charm people instantly notice. And if you’re thinking about selling at craft fairs, this design definitely stands out on a table.
If you enjoyed making this, share it with someone who loves crochet as much as you do—it’s the kind of pattern that’s too beautiful to keep to yourself.